I saw a link to this video on Facebook yesterday. After watching it, I went food shopping and bought a price-reduced free-range chook ($11.60) and followed the instructions on this video. From one chook I made 6 cups of chicken stock, 2 large chicken breasts, 2 drumsticks, 2 thighs and 2 wings. Apart from the savings dollar wise, I'm also happy with the reduction in packaging that I would have had to throw away if I had bought these products separately. No stock packaging, no meat trays wrapped in plastic for the chicken portions, just one lot of plastic packaging that was wrapped around the chook to have to deal with.
So if you're looking to save money and packaging for chicken portions and stock, and don't mind spending a few minutes cutting them up yourself, give this a go. I chucked the backbone and any other bones and skin that I removed in my slow cooker with a carrot and onion and some parsley, with enough water to cover the carcass, for 4 hours on high. Put it in the fridge to cook and then skim the fat off before putting into containers to freeze.
Also, I put the chicken portions into reusable freezer safe containers and labelled them.
http://www.nytimes.com/video/dining/100000002155362/cutting-up-a-whole-chicken.html
Monday, October 19, 2015
Sunday, August 16, 2015
Gluten Free Fried Ice-Cream
Following a visit to a Naturopath, I've been cutting gluten out of my diet. On the weekend I wanted to make Chinese food. I have a Chinese cook book, but the recipes aren't gluten free. So...I just substituted ingredients containing gluten for the gluten-free alternatives.
The whole meal was a big hit, but the fried ice-cream was a big winner. So here's the recipe:
Ingredients:
2L full cream good quality ice cream.
gluten free flour
2 eggs
1/4 cup milk
rice bread crumbs (or you could use ordinary gluten free bread crumbs)
Oil for deep frying
Put a baking tray in the freezer until it is very cold.
Using an ice cream scoop, scoop the ice cream into balls and place on the baking tray. Place in the freezer until hard.
Take the ice cream balls out of the freezer and working quickly, coat the balls in the flour. Shake off excess flour, dip in combined beaten eggs and milk, then in breadcrumbs. Place back on the tray and back in the freezer until hard.
Repeat the egg/milk and breadcrumbing until you have a firm coating. Freeze until hard.
When it comes time to fry the ice cream balls, place ice cream balls two at a time in deep hot oil. Fry until golden, about 30 seconds. If you leave it too long, the ice cream will melt and disperse into the hot oil. Place on absorbent paper to drain the oil. Serve immediately.
I found the rice bread crumbs gave the finished product a super crispy coating and was delicious. The kids had chocolate sauce on theirs, but I loved mine with my home made lemon and lime curd, which was a surprisingly delicious combination with the fried ice cream.
Recipe adapted from The Australian Women's Weekly Home Library Chinese Cooking Class Cookbook, published 1995.
Tuesday, June 9, 2015
Need some inspiration in life? Join the club.
I admit...I use Facebook. It started off as just a means to communicate with friends and relatives interstate, but now I'm connected to people I haven't met before but we have something in common. That is, we've joined a group.
I've joined a few groups recently and both are giving me some renewed enthusiasm in life. I have an interest in designing and building environmentally friendly homes, so have joined a group demonstrating and promoting building with straw bales. I haven't built one yet, but would love to give it a go one day. Another group I joined is called Aussies Living Simply, and some of the ideas on there match perfectly with what I am trying to achieve with this blog. If you're a follower of this blog, check out their Facebook page.
However one group that I've joined that I have been able to put into practice and amazed by the results is Slow Cooker Recipes 4 Families AUSTRALIA ONLY. I've learnt many more recipes and have been astounded by what can actually be done in a slow cooker! On the weekend I made pavlova in the slow cooker and would certainly do it again. Today I made cheese and vegemite scrolls and they were so simple and worked out well. Check out the recipe under the photos section of the groups Facebook page, however if you're not on Facebook and have a slow cooker, here's the recipe.
2 cups self raising flour
1 cup yoghurt.
Line slow cooker with baking paper. Knead ingredients together to form a dough. Roll out and spread with vegemite (or in my case, Dick Smith's Ozemite which tastes better - much like Vegemite was when I was a kid) and grated cheese. Roll up and slice. Lay slices on paper in slow cooker. Place a tea towel under the lid of the slow cooker to absorb the moisture (otherwise you might end up with soggy dough). Cook on High for 1.5 hours. Turn scrolls over for the last 15 mins to brown on top.
The advantages of using the slow cooker for me are: I have solar panels, so this uses the energy I produce rather than the gas oven. The slow cooker is up on the bench out of the reach of little hands that might get burnt, where my oven is down low. I could've put this recipe in the slow cooker, then go out and do something, like pick up kids from school or run an errand, where I wouldn't do that with the oven on. Admittedly, the instruction manual probably says not to leave it unattended, but many slow cooker owners do.
I'm planning to make a pie in the slow cooker tomorrow night after seeing it in a recipe book. Thanks to the group I joined, I'm trying new things with the kitchen equipment I've already got. Maybe I'll take a photo of it and upload it to their page with the recipe!
Oh, Pauline's Tips has a page on Facebook as well. Check it out and feel free to join and invite your friends to as well!

Wednesday, May 20, 2015
Macadamia Milk scones
I had some Macadamia Milk left over in the fridge from making my Feijoa and Macadamia Milk ice cream. So I decided to try it in some scones.
Ingredients:
2 cups self raising flour
1 cup Macadamia milk
approx 30g butter.
To be honest, I'm so used to making scones, I don't actually measure the butter out anymore. I just cut a bit off the block and think "that will do."
Preheat oven to 400C or 200F. Line a lamington tray or deep sided baking dish with baking paper or use a silicone baking sheet.
Sift flour. Rub in butter. Add milk. Using a knife, 'cut' through the ingredients in the bowl until they are blended enough that it is starting to look like a dough. Knead lightly. Don't do it too much or your scones will be tough instead of light and fluffy.
Roll out to desired thickness. Cut scone shapes using a cookie/scone cutter and lay in tray with scones gently touching each other. This way the scones will be forced to rise up instead of out. Place tray on top shelf as they need the hottest part of the oven.
Brush with some more of the Macadamia Milk and bake in oven for about 15 mins. Scones should sound hollow when tapped.
Once cooked, cool on a rack and separate the scones so they don't sweat.
These taste delicious on their own and stay quite moist.
Feijoa and macadamia milk ice cream
A few months ago I saw Macadamia Milk in the UHT section of the supermarket. I had previously made a very yummy rice milk ice cream, so thought Macadamia Milk would be delicious in an ice cream.
Here's my Feijoa ice cream using Macadamia Milk. One day I'll get around to trying the dairy free version, the same way I make it with rice milk, and see how it turns out. If it's any good, I'll blog it.
Ingredients:
1.5 cups feijoa pulp
3/4 cup Macadamia Milk
2/3 cups caster sugar
1.5 cups cream
1.5 tsp vanilla essence
Blend the pulp until it is smooth. In another bowl, blend the milk and sugar until the sugar has dissolved. Add the cream, feijoa pulp and vanilla and blend until thoroughly mixed in.
Place into an icecream maker and follow manufacturers directions. I don't have an ice cream maker, so I put mine in a freezer safe plastic container with lid, and freeze for a few hours. Take out and beat until smooth. Put back into container and freeze again. Do this until you get the desired frequency.
My husband isn't a big fan of feijoas, but even he says this ice cream is delicious.
Tuesday, May 5, 2015
How to stop biting your nails.
I've been a nail biter all my life. I have given up a number of times, and fallen off the wagon. I've tried all sorts of remedies for stopping. Last night I searched the web for "how to stop nail biting" and most of them, including the ones written by pyschologists, said the same thing.
So here's my tips on what has helped me stop biting before (and again this time, as I haven't bitten them for 3 months now since I started the routine again).
But first, a little bit of background. I'm the type of biter who bites the nails right down. When that happens, they are sore to pick things up, put my hands in the sink to wash dishes or to brush any product on them. I've read about people who like biting their nails, I'm not one of them. I'm embarrassed to show my hands, often hiding them away from sight. I get frustrated that I can't pick up sewing needles off the floor, or remove a splinter, or do anything else that nails with even a little bit of length would enable me to do. Plus, my husband says how nice my hands look when my nails have some length in them (but not too long).
Here has what has worked for me. Up front I'll let you know that I will be mentioning products by name, but I'm not sponsored by any company, although I am a Nutrimetics consultant.
Be ready to stop
There's been all sorts of research into why people bite their nails. Basically I bite when I'm bored or stressed, or my hands are idle. Adult nail biters have usually been doing it for so long that they will bite their nails without even realising they are doing it, and that's happened to me. I have family members who are nail biters, so maybe I picked it up very young. I certainly notice that when I bite my nails, my 5 year old son starts doing the same. When I stop, so does he.
The times that I have been successful at stopping the biting is when I have been ready to. There's not much point starting when you are feeling depressed, stressed, or whatever your trigger for nail biting is. Get your mind ready first. Some years ago I remember looking at my nails and rather calmly saying to myself 'I'm not going to bite them anymore' and I didn't bite them for 2 years. I tried replicating that when I fell off the wagon and failed. I realised that what I needed to do was be in the right mindset to stop. I had to want to stop, and not just to have nice nails for an upcoming social occassion.
I know when I'm in the right mindset now. It's when I can look at my hands and they look like they don't really belong to me....that the bitten unsightly nails don't match how I feel about myself. When I had post natal depression I was biting my nails. I didn't try to stop as my hands matched the way I felt about myself, so I knew that if I tried I would fail.
Be prepared to stop
Ok, here's where I mention some products. You need to look after your nail health as when your nails start to get some length in them they will probably be weakened by the nail biting habit. Concentrate on getting the nails strong before getting them long.
Two techniques using nail products that have worked for me.
No painting method: Years ago, before I joined Nutrimetics, my mum sent me some of their Hand and Nail treatment creme. I also bought some Mavala Scientifique nail hardener. What's so special about this nail hardener? It's the only one I found that actually soaks into the nail rather than just coating it. Most nail hardeners leave a coating on your nail when you brush it on, and after a few layers or days you are supposed to remove it. The Mavala one is applied to the tip of the nail only, and soaks in through the layers of nail, bonding them together and making them stronger. You apply it twice a week until the nails are strong, and then once a month or when needed after that to maintain the strength. It seems expensive for such a little bottle but one bottle lasts for years! I used to be able to buy it in chemists but now can only find it in on-line chemist shops.
After applying the nail hardener, I would rub the hand creme in, making sure to massage the cuticles. I would keep the nail hardener and hand creme by my bed and do it at night, that way I wouldn't forget to do it. I now have several family members using the nail hardener too!
Painting method: This is the one I am using at the moment. Once a week I remove the remnants of nail polish, clean my nails, buff, file, apply nail hardener, and then paint my nails. I used a bright red or pink at the start. It looks terrible on bitten nails, but served as a reminder when I would go to bite them.
This photo is of my nails taken a few weeks ago. My hands look terrible as I took the photo before using a scrub on my hands to remove dead skin cells.

I've tried false nails, but they didn't work for me. I know they work for some, but they didn't do any good for my nail health and my nails were weak when they came off.
Have emery boards everywhere!
Have one in the bedroom, one in the kitchen, one in your bag, one in the car...Many nail biting episodes have started for me by the presence of a broken nail without having an emery board handy.
Get your nails strong before getting them long
Avoid the temptation to get your nails long quickly. They will most likely be weak and break quickly, leaving you disappointed, and possibly biting again.
Replace one habit with another
Many websites about stopping biting mention this technique. Some suggest having a rubber band around your wrist that you can fling when you get the urge to bite, or clench your hands into a fist, or use one of those horrible tasting nail products (they've never worked for me, I've continued biting despite the bitter taste). I found I fiddle with my fingers a lot. My husband says he much prefers the fiddling to the biting, but it annoys the heck out of me! I just can't seem to keep my hands still! Maybe one day I'll find a replacement habit that doesn't annoy me so much!
Nail Biters Anonymous
I once remember hearing that there are no former alcoholics, only ones that have stopped drinking. I have had much more success with stopping biting my nails with this same mentality. In the past, whenever I thought 'I'm never going to bite my nails again' I haven't been able to keep at it for long. When I changed my thinking to 'I'm a nail biter who just isn't biting my nails' I have been able to stay with it for years.
The longest I have gone without biting is 2 years. I have had naturally long nails for my wedding, and the birth of both my children. Consequently, I wasn't hiding my nails for the photos in these events.
 This photo shows my hand at the birth of my son. No nail polish, practical length, healthy nails and nice, clean, naturally white tips.
I hope this is of some help (and support) to those of you out there that are chronic nail biters.
So here's my tips on what has helped me stop biting before (and again this time, as I haven't bitten them for 3 months now since I started the routine again).
But first, a little bit of background. I'm the type of biter who bites the nails right down. When that happens, they are sore to pick things up, put my hands in the sink to wash dishes or to brush any product on them. I've read about people who like biting their nails, I'm not one of them. I'm embarrassed to show my hands, often hiding them away from sight. I get frustrated that I can't pick up sewing needles off the floor, or remove a splinter, or do anything else that nails with even a little bit of length would enable me to do. Plus, my husband says how nice my hands look when my nails have some length in them (but not too long).
Here has what has worked for me. Up front I'll let you know that I will be mentioning products by name, but I'm not sponsored by any company, although I am a Nutrimetics consultant.
Be ready to stop
There's been all sorts of research into why people bite their nails. Basically I bite when I'm bored or stressed, or my hands are idle. Adult nail biters have usually been doing it for so long that they will bite their nails without even realising they are doing it, and that's happened to me. I have family members who are nail biters, so maybe I picked it up very young. I certainly notice that when I bite my nails, my 5 year old son starts doing the same. When I stop, so does he.
The times that I have been successful at stopping the biting is when I have been ready to. There's not much point starting when you are feeling depressed, stressed, or whatever your trigger for nail biting is. Get your mind ready first. Some years ago I remember looking at my nails and rather calmly saying to myself 'I'm not going to bite them anymore' and I didn't bite them for 2 years. I tried replicating that when I fell off the wagon and failed. I realised that what I needed to do was be in the right mindset to stop. I had to want to stop, and not just to have nice nails for an upcoming social occassion.
I know when I'm in the right mindset now. It's when I can look at my hands and they look like they don't really belong to me....that the bitten unsightly nails don't match how I feel about myself. When I had post natal depression I was biting my nails. I didn't try to stop as my hands matched the way I felt about myself, so I knew that if I tried I would fail.
Be prepared to stop
Ok, here's where I mention some products. You need to look after your nail health as when your nails start to get some length in them they will probably be weakened by the nail biting habit. Concentrate on getting the nails strong before getting them long.
Two techniques using nail products that have worked for me.
No painting method: Years ago, before I joined Nutrimetics, my mum sent me some of their Hand and Nail treatment creme. I also bought some Mavala Scientifique nail hardener. What's so special about this nail hardener? It's the only one I found that actually soaks into the nail rather than just coating it. Most nail hardeners leave a coating on your nail when you brush it on, and after a few layers or days you are supposed to remove it. The Mavala one is applied to the tip of the nail only, and soaks in through the layers of nail, bonding them together and making them stronger. You apply it twice a week until the nails are strong, and then once a month or when needed after that to maintain the strength. It seems expensive for such a little bottle but one bottle lasts for years! I used to be able to buy it in chemists but now can only find it in on-line chemist shops.
After applying the nail hardener, I would rub the hand creme in, making sure to massage the cuticles. I would keep the nail hardener and hand creme by my bed and do it at night, that way I wouldn't forget to do it. I now have several family members using the nail hardener too!
Painting method: This is the one I am using at the moment. Once a week I remove the remnants of nail polish, clean my nails, buff, file, apply nail hardener, and then paint my nails. I used a bright red or pink at the start. It looks terrible on bitten nails, but served as a reminder when I would go to bite them.
This photo is of my nails taken a few weeks ago. My hands look terrible as I took the photo before using a scrub on my hands to remove dead skin cells.

I've tried false nails, but they didn't work for me. I know they work for some, but they didn't do any good for my nail health and my nails were weak when they came off.
Have emery boards everywhere!
Have one in the bedroom, one in the kitchen, one in your bag, one in the car...Many nail biting episodes have started for me by the presence of a broken nail without having an emery board handy.
Get your nails strong before getting them long
Avoid the temptation to get your nails long quickly. They will most likely be weak and break quickly, leaving you disappointed, and possibly biting again.
Replace one habit with another
Many websites about stopping biting mention this technique. Some suggest having a rubber band around your wrist that you can fling when you get the urge to bite, or clench your hands into a fist, or use one of those horrible tasting nail products (they've never worked for me, I've continued biting despite the bitter taste). I found I fiddle with my fingers a lot. My husband says he much prefers the fiddling to the biting, but it annoys the heck out of me! I just can't seem to keep my hands still! Maybe one day I'll find a replacement habit that doesn't annoy me so much!
Nail Biters Anonymous
I once remember hearing that there are no former alcoholics, only ones that have stopped drinking. I have had much more success with stopping biting my nails with this same mentality. In the past, whenever I thought 'I'm never going to bite my nails again' I haven't been able to keep at it for long. When I changed my thinking to 'I'm a nail biter who just isn't biting my nails' I have been able to stay with it for years.
The longest I have gone without biting is 2 years. I have had naturally long nails for my wedding, and the birth of both my children. Consequently, I wasn't hiding my nails for the photos in these events.

I hope this is of some help (and support) to those of you out there that are chronic nail biters.
Monday, April 27, 2015
Financial advice for new couples, or anyone considering buying a house or starting a family in the future.
My sister got married back in the '80's. I remember her telling me that she asked her friends "What do you do with two incomes coming in?" This is a question that I have heard many times, usually from people who have just moved in together/got married. When my sister asked her friends, below are the types of responses she got.
A. It's great having two incomes coming in, you can afford to go to a restaurant every week!
B. We pay the mortgage out of his income and the bills and food shopping out of mine
C. We pretend that his wage is the only one coming in, and we save mine.
Within a few short years, her friends started having babies. A pattern started to emerge. I've always believed that humans are creatures of habit, we get used to life being a certain way. You would expect that Couple A who thought two incomes coming in was great and went out to restaurants and overseas holidays would find it a shock to suddenly be on one wage while one of the parents takes some time off work to look after a baby. It's a big job getting used to the changes a baby brings, without also having to totally change your spending habits and mindset! I used to work in a bank and saw many Couple A's go from being happily married to coming into the bank arguing about money and who spends what.
Couple B also may find they have to change their spending habits, especially if the wage that was paying the mortgage was only just covering the mortgage repayments! Now on one wage, they have to pay the mortgage and bills and food shopping.
I have often seen friends who operate their finances separately (in other words, he has his money and she has hers) also arguing over money when a baby comes along, if they drop down to one wage. I remember hearing one work colleague complaining that her husband still spent his money the same way he did before baby came along (creature of habit), while she not only was not earning an income, but her savings quickly dwindled as she was still paying bills and food expenses out of her savings and buying stuff for the baby. After some harsh words, they reached a new agreement over who pays for what, but she still had to return to work earlier than she planned to as she ran out of money. I remember this colleague explaining how disheartening it was to not have money to go out for a coffee with friends, and her husband not being used to give her any for such a luxury, complaining about having to do so while he still spent money on his cars the way he had always done.
Couple C - Now I remember my sister saying at the time that they were about the only ones of her friends who weren't arguing about money! Surprise, surprise?!?! They were used to being on one wage. Couple C paid all the bills, food shopping, mortgage repayment and spending money out of the husbands wage. The wife's wage went into the mortgage as an extra repayment, helping to pay off their home sooner.
My sister followed the example of Couple C, as did my husband and I when we first moved in together. We had about 5 years together before we got married, and another 2 before children came along. In the meantime, we pretended my wage didn't exist. By the time we bought a house we had saved a considerable amount, meaning we didn't have to borrow much. And certainly by the time children came along, our financial habits had set and didn't have to change much. We still had to proceed with caution, as with me not working for the first two and half years and then only working part time since then, it's harder to save without that second income. We have followed the model of Couple C now for 15 years and have gotten used to it. We don't stress whenever there is a mortgage interest rate rise, and we don't argue about money.
I'm not a professional financial advisor, but I urge you to consider your own circumstances before following anything I have advised here. Think about your spending personalities and which approach would be compatible to you and your partner. Think long term - you might not be buying a house or starting a family now, but will you be in the future? Set your financial habits early in your relationship as they are harder to change later on. Not everyone will be happy following the model of Couple C, but from my experience, it works really well.
Monday, April 13, 2015
School holiday activities
My son started school this year, and the first term has just finished. He is the sort of kid who loves mental stimulation, so playing with toys is fun for awhile but only for so long before he starts wanting to use his brain again. So I made a bit of a list of possible activities for the school holidays. I had two things to consider when making this list other than the needs of my son: I also have a 2 year old daughter and still have my usual jobs to do (cooking, cleaning, etc). So here is my list:
Library school holiday program
Our local library offers an excellent school holiday program, with all sorts of activities, mostly free, to keep the kids entertained. Not all are suitable to my daughter or of interest to my son, but we will make use of the ones that tick the boxes for both kids. Alternatively, the library is still a good place to go even when the activities aren't on.
Make and play with playdough
Lately my son wants to make things in the kitchen. One of the things we made recently was playdough. He enjoyed making it and then both kids have enjoyed many hours playing with it. To make things interesting, make sure you have cookie cutters (or anything you can use to cut shapes out of) and possibly a rolling pin.
Go to the playground
We have loads of them near our house. Unfortunately some of them have fences around them as they are currently being upgraded, but there are still others to explore. It gets the kids outside and gives me an excuse to go for a walk and get some exercise.
Bake Biscuits.
We did this today with both kids. They enjoyed it as they got to mix the dough and cut out the biscuit shapes AND lick the bowl...but the best bit is eating the results.


Roller skating
My son did this at Vacation Care and really loved it, the only problem will be what to do with my daughter.
Bike Rides
This will be good for exercise, get the kids outside and also gives us the opportunity for my son to practice riding without training wheels.
Train rides
Big and little! Both kids love going on miniature train rides, but we could also select a destination and go on a real train for a day trip.
Tennis
We have a totem tennis pole that the kids love to play with. My son also does Tennis lessons during the school term, and the coach offers special classes during the holidays that we can access.
Go camping
A family favourite. Pack up the camper trailer and head off somewhere. The kids have NaturePlay SA Passports which they will enjoy finding activities they can do while camping.
Arts and crafts
Painting, colouring in, drawing...all favourites of both kids. My tip is to have plenty of scrap paper on hand for these projects and save the good paper for artwork that will be sent to the grandparents!
Games
This one is a bit difficult to do with the age difference between my kids at the moment. Board games are a good way to practice maths, reading and spelling skills while having some fun. A good indoors activity for rainy days.
Plant a vegie garden for Winter
There's a theory that kids who have their own vegie garden will eat what they produce. I can tell you it doesn't work, at least not for my son. However, he does love having his own vegie garden, so we will be pulling out the summer crop and putting in the winter vegies over the holidays.
Garden gnomes
I've not done this before but am considering getting some unfinished garden gnomes and paints and letting the kids go for it!
Movies
Another bad weather & stay indoors activity. Let the kids watch a movie, make some popcorn and relax for a bit. A good one also for kids that are tired at the end of an 11 week school term!
Of course, there will be a few playdates with friends during this two weeks. My son is also booked into Vacation Care on the days that I'm working. There's a bit to chose from here, so hopefully I won't get too many "I'm bored" comments!
Monday, March 30, 2015
Inspiring words..."I love your blog."
I often hear that if you have a blog, you should update it regularly to keep your followers interested. Admittedly, I don't do mine often enough. Unfortunately life gets in the way...house to clean, family to feed, other commitments, blah blah blah. And sometimes, I don't feel that I have anything interesting to write about. However, recently I visited a friend and she commented about something she found recently on my blog, an entry I did a long time ago, and told me how much she loves my blog.
I went through the photos on my phone and found that I had taken photos of things that I had done, but hadn't yet written a post to go with them. The danger of leaving it so long is that I sometimes forget what it was I was going to write a post about. That is what happened with the cheese and chives scone picture here. I can't remember if these are dairy free or if there was anything special about this recipe, other than I used my home grown chives which I have in abundance.
On a personal note, my husband and I dragged the kids along to the Caravan and Camping Show in February. My son didn't want to go, but we gave him the job of using the site map to find the things we wanted to look at. He loves maps and numbers, so he was more than happy with that job. On our way around, there was a kids activity tent to keep the kids happy. From there you could collect another map showing where you could collect a special kids bag and some things to go in it. There was also a competition form to fill in, which I did.
Now, I think the last time I won something other than the odd small lotto win was about 15 years ago, so I got the surprise of my life to get a phone call telling me I had won the competition. I was beside myself with excitement when the lady told me what I had won; a 9 person tent, 4 camping chairs, 4 sleeping bags, 2 lanterns and a camping table. We already have two tents and a camper trailer, so when the weekend came I set up the tent with the idea of sleeping in it for one night and take some photos of it to list it for sale on the internet. My son, who was reluctant to go to the show, was very excited with the win. I reminded him that if we didn't go to the show (which was his desire) we wouldn't have won. The moral of the story being that sometimes doing something we don't want to do can bring it's own rewards.


Of course, I'm just happy to have won a chair that has a wine holder! What will they think of next?

Another stumbling block to updating my blog previously was internet usage. Often we would go over the 2GB of internet that our plan allowed, then it would slow to dial up speed, making uploading photos and updating my blog difficult and frustrating. A recent phone call to our telephone company saw an upgrade of our internet plan which then spurred an update of our home phone and mobile phone plans. It costs us a little more each month, but the advantages are that we have much more internet allowance on our home internet as well as being able to call family interstate at any time of the day which is handy considering the time difference for us (especially during daylight saving months, it can be as much as 2.5 hours). We can keep in touch with family and friends more often. The moral of this story...sometimes you have to spend money to save money.
And if you've been wondering what has been happening in my garden, well, not much. The temperatures over summer means that we didn't get much in the way of productive flowering for our tomatoes, pumpkins and rockmelons. The tomatoes and peas have died, unfortunately. We received just a few small rockmelons and while our pumpkins haven't been prolific in fruit, they are producing lovely large, tasty pumpkins when they do. I wish I had taken a photo of this 4kg pumpkin before I cut it. I have only used 3/4 of it so far and made delicious pumpkin soup and my famous pumpkin, spinach and olive lasagna.

Speaking of the lasagna that I made, I was using gluten free lasagna sheets. I have been trying to eat gluten free foods, but finding things like home made gluten free bread, cakes, etc are very bland and have a sandy texture. If you have any tasty gluten free recipes, please let me know about them either by putting a comment on this blog or by emailing me on paulinestips@gmail.com.
I went through the photos on my phone and found that I had taken photos of things that I had done, but hadn't yet written a post to go with them. The danger of leaving it so long is that I sometimes forget what it was I was going to write a post about. That is what happened with the cheese and chives scone picture here. I can't remember if these are dairy free or if there was anything special about this recipe, other than I used my home grown chives which I have in abundance.

On a personal note, my husband and I dragged the kids along to the Caravan and Camping Show in February. My son didn't want to go, but we gave him the job of using the site map to find the things we wanted to look at. He loves maps and numbers, so he was more than happy with that job. On our way around, there was a kids activity tent to keep the kids happy. From there you could collect another map showing where you could collect a special kids bag and some things to go in it. There was also a competition form to fill in, which I did.
Now, I think the last time I won something other than the odd small lotto win was about 15 years ago, so I got the surprise of my life to get a phone call telling me I had won the competition. I was beside myself with excitement when the lady told me what I had won; a 9 person tent, 4 camping chairs, 4 sleeping bags, 2 lanterns and a camping table. We already have two tents and a camper trailer, so when the weekend came I set up the tent with the idea of sleeping in it for one night and take some photos of it to list it for sale on the internet. My son, who was reluctant to go to the show, was very excited with the win. I reminded him that if we didn't go to the show (which was his desire) we wouldn't have won. The moral of the story being that sometimes doing something we don't want to do can bring it's own rewards.


Of course, I'm just happy to have won a chair that has a wine holder! What will they think of next?

Another stumbling block to updating my blog previously was internet usage. Often we would go over the 2GB of internet that our plan allowed, then it would slow to dial up speed, making uploading photos and updating my blog difficult and frustrating. A recent phone call to our telephone company saw an upgrade of our internet plan which then spurred an update of our home phone and mobile phone plans. It costs us a little more each month, but the advantages are that we have much more internet allowance on our home internet as well as being able to call family interstate at any time of the day which is handy considering the time difference for us (especially during daylight saving months, it can be as much as 2.5 hours). We can keep in touch with family and friends more often. The moral of this story...sometimes you have to spend money to save money.
And if you've been wondering what has been happening in my garden, well, not much. The temperatures over summer means that we didn't get much in the way of productive flowering for our tomatoes, pumpkins and rockmelons. The tomatoes and peas have died, unfortunately. We received just a few small rockmelons and while our pumpkins haven't been prolific in fruit, they are producing lovely large, tasty pumpkins when they do. I wish I had taken a photo of this 4kg pumpkin before I cut it. I have only used 3/4 of it so far and made delicious pumpkin soup and my famous pumpkin, spinach and olive lasagna.

Speaking of the lasagna that I made, I was using gluten free lasagna sheets. I have been trying to eat gluten free foods, but finding things like home made gluten free bread, cakes, etc are very bland and have a sandy texture. If you have any tasty gluten free recipes, please let me know about them either by putting a comment on this blog or by emailing me on paulinestips@gmail.com.
Monday, March 9, 2015
Cheap and Cheerful: Camping
Remember the days when staying in a caravan park was relatively inexpensive? For us, that was the BC days....before children. Now that our two children are over the age of 2, we often find we have to pay for them on top of the site fee at a caravan park. For example, on the Australia Day long weekend we stayed at the Riverton Caravan Park and were charged $28 per night for the site plus $10 extra for the two kids as the site fee only covers two people. Now, the caravan park is quite nice; it's small, has a nice playground and the facilities are clean, but it's not a flash caravan park by any means. I believe it is run by the local council and has a reception desk available during usual office hours. While we were there we took a drive to Saddleworth in the Clare Valley and found a nice little caravan park next to the town oval. We chatted to a bloke there who was on the committee for the caravan park and he said they charge $20 for a powered site and $10 for unpowered, regardless of how many people were staying there, you only pay for the site. The showers and toilets were basic and nothing flash, but he did mention that they had received some government funding and are planning to install ensuites which will make it a bit nicer. There is a playground and undercover bbq area with sink and hot/cold running water. The grassed area was lovely and shady and it was a short walk into town.
Armed with the knowledge that bookings weren't required, it was first in best dressed at this caravan park, for the Adelaide Cup long weekend just gone we headed off in our camper trailer to Saddleworth. When we arrived there, the powered sites adjoining the grassy area were already taken. There was one more powered site, but no grass and it was next to the septic outlet so was a bit "on the nose." So we set up camp under a shady tree and went unpowered for the night.
That was Friday night. On Saturday morning two of the caravans packed up and left, so we quickly moved camp over to the powered site, set up our camper trailer on the grass and were very pleased with the spot. Even more pleasing was the price. When the caretaker came down later, we paid $50 for three nights accommodation - $10 for one night unpowered and $40 for two nights with power. The kids were happy with the playground, even though it wasn't really suitable for our 2 year old, our 5 year old loved it. If you have ever used toilets in a small town you will know what I mean when I say the toilets and showers were clean enough but not spotless (small spiderwebs and the occassional insect sharing your shower with you). The grassed area was lovely, had shady trees and on two nights we cooked our dinner on the free and exceptionally clean bbq.
One thing I like about staying in these small town caravan parks adjoining ovals is that usually over the weekend there is some sport to watch. We got to watch the cricket matches played in Saddleworth over the weekend. I saw the most amazing thing - the batsman hit the ball high into the air. It would have been a sitter if the fieldsman could have got under it, instead he didn't get there in time. The ball fell to the ground, bounced, hit the wicket and knocked off the stumps! As the batsman walked off the ground my husband and I figured that technically he was bowled out. The fielding team couldn't believe their luck.
Saddleworth Caravan Park isn't widely advertised, they apparently like the fact that their little caravan park is quiet and not too popular. So if you want a trip down memory lane to the days when camping in a caravan park with or without kids was cheap, it's worth checking it out. If you don't live in South Australia, the next time you are driving through a small country town, check out it's local committee or council run caravan park. You may find it a lot cheaper and friendlier than larger caravan parks in larger towns. Saddleworth Caravan Park is also pet friendly (at the caretakers discretion).
Tuesday, February 10, 2015
Ceiling Fans review...cut the costs of cooling your home and make life more comfortable
Many years ago we lived in the lush, beautiful tropical town of Kununurra, Western Australia. Just about every room in every house there had ceiling fans, and we loved them. Seven years ago we bought our house here in Adelaide, South Australia, and every summer we said "one day we'll get ceiling fans installed." Well,last November that one day came. We decided it was high time to get it done, it wasn't going to get any easier or cheaper.
We contacted an electrician that we had used before to ask what ceiling fans he would recommend and quote for installation. He told us where he gets the fans from and which one he thought we should get so that we could go to their showroom and have a look. So we went and had a look at the Lucci Futura Eco Series fans and the lady in the shop was very helpful. We went and had a look in other fan shops, but the sales assistants didn't seem interested in trying to make a sale, their display wasn't as good or they didn't know as much about the product. We went back to the original shop (the name of the shop escapes me at the moment!) and spoke to the same sales assistant and had a few more questions answered.
We decided the Lucci Futura would be good for the bedrooms. They have three speeds and a light fitting that looked reasonably nice. As we have a low pitch roof with no crawl space the electrician would be unable to get into the roof to install wiring. The fans could be installed where there was a light fitting already, without having to get into the roof space. However, we had to go with using a remote control instead of a switch on the wall. We opted to go for the Lucci LCD Fan Remote Control (Series No. SKU 210013) as it has a temperature control and timer function. We thought this would be handy for the bedrooms as we could set the temperature and the fan speed automatically adjusts according to the temperature of the room. When the temperature drops to match the temperature you have set it at, it stays at low speed to maintain the temperature. If it drops below, it automatically switches off, and only switches back on again if the room warms up. That would mean we wouldn't have kids calling out in the middle of the night that they are cold and could we please switch their fans off!
 So that was the bedrooms sorted out, but for the lounge room and dining room we wanted a fan with a really slow low speed. There is nothing worse than sitting at the dining table enjoying your meal but getting a thudding from the fan blowing air on you. The Lucci Airfusion Climate II DC ceiling fan has speeds, with the lowest being so low it feels more like a gentle breeze or slight airflow you would get from having a window open, rather than a fan on. Much more pleasant for sitting directly under when eating your dinner. A remote control is included, so we didn't need to get them as an extra. Another advantage of the DC fan is how efficient they are...on the slowest speed they use 4 watts. You can get them with a light fitting, but we weren't going to need that for the lounge room and dining room, as we didn't want the fans where the lights were.
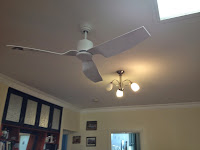 We only had to wait two weeks for the electrician (Robertson Brothers) to come and do a very professional job of installing them. Oh, I've just remembered the name of the fan shop, Beacon Lighting at Mile End. Robertson Bros supplied and installed all 5 fans and remotes for $2,200.00. I thought that was very reasonable, given the difficulties in installation. If you were to go for switches instead of remotes for the Futura fans, you would save more, as the Lucci LCD remotes are $100 each,
It's funny how things look differently installed at home than they do in the showroom. In the show room we preferred the look of the Futura fans to the DC ones, but once installed, thought the DC ones looked fantastic and blended in really well with the house, while the Futura ones looked a bit old fashioned. Nonetheless, we are extremely impressed with our choice in fans and remote controls.
This summer we have hardly used our air conditioner. Instead, we have used the fans a lot, keeping the house at a comfortable temperature both day and night. We have solar panels and consequently don't get electricity bills, but it will be interesting to see how much our usage is compared to previous summers at the end of this one.
The new fans are so quiet, sometimes you forget that they are on, except for the feeling of a breeze inside the house!
We contacted an electrician that we had used before to ask what ceiling fans he would recommend and quote for installation. He told us where he gets the fans from and which one he thought we should get so that we could go to their showroom and have a look. So we went and had a look at the Lucci Futura Eco Series fans and the lady in the shop was very helpful. We went and had a look in other fan shops, but the sales assistants didn't seem interested in trying to make a sale, their display wasn't as good or they didn't know as much about the product. We went back to the original shop (the name of the shop escapes me at the moment!) and spoke to the same sales assistant and had a few more questions answered.
We decided the Lucci Futura would be good for the bedrooms. They have three speeds and a light fitting that looked reasonably nice. As we have a low pitch roof with no crawl space the electrician would be unable to get into the roof to install wiring. The fans could be installed where there was a light fitting already, without having to get into the roof space. However, we had to go with using a remote control instead of a switch on the wall. We opted to go for the Lucci LCD Fan Remote Control (Series No. SKU 210013) as it has a temperature control and timer function. We thought this would be handy for the bedrooms as we could set the temperature and the fan speed automatically adjusts according to the temperature of the room. When the temperature drops to match the temperature you have set it at, it stays at low speed to maintain the temperature. If it drops below, it automatically switches off, and only switches back on again if the room warms up. That would mean we wouldn't have kids calling out in the middle of the night that they are cold and could we please switch their fans off!


It's funny how things look differently installed at home than they do in the showroom. In the show room we preferred the look of the Futura fans to the DC ones, but once installed, thought the DC ones looked fantastic and blended in really well with the house, while the Futura ones looked a bit old fashioned. Nonetheless, we are extremely impressed with our choice in fans and remote controls.
This summer we have hardly used our air conditioner. Instead, we have used the fans a lot, keeping the house at a comfortable temperature both day and night. We have solar panels and consequently don't get electricity bills, but it will be interesting to see how much our usage is compared to previous summers at the end of this one.
The new fans are so quiet, sometimes you forget that they are on, except for the feeling of a breeze inside the house!
Wednesday, February 4, 2015
Two in one recipe: Peach and rockmelon juice and peach, rockmelon and passionfruit sorbet - egg free, dairy free
I have a juicer which is great but I find that, during the process of extracting juice, there is a lot of pulp left behind. I don't want to waste the perfectly good fruit pulp, so the other day when I made this Peach and Rockmelon juice, I used the pulp left over to make a very yummy sorbet.
For the juice:
1/2 rockmelon (cantaloupe)
4 peaches
2 oranges
1 tablespoon lime juice
Juice the fruit according to the instructions for your juicer. For example, I have a different attachment for doing 'fleshy' fruits like the peaches and rockmelons and another attachment for juicing citrus fruits. Months ago I juiced a heap of limes and put them in the ice cube trays in the freezer. I picked out enough cubes of frozen lime juice to make about 1 tablespoon and added them to the rest of the juice.

For the sorbet:
Collect the pulp of the peaches and rockmelons from the juicer.
 In a saucepan, place 1 cup of sugar to 1 cup of water and slowly bring to a boil until sugar has dissolved. Put aside to cool completely.
Once cool, stir into the pulp along with some passionfruit pulp and seeds (or omit if you don't like passionfruit).
Place into a shallow freezer proof plastic container and freeze. After a few hours (when it is almost frozen solid), pull out and beat, then place back into the container and freeze again. If you leave it longer (I left mine for two days!) and it is frozen solid when you pull it out to beat it, just let it sit at room temperature until it softens.
Many sorbet recipes say to whip raw egg whites into frozen mixture when beating it. With two young kids in the house I wasn't keen on using raw eggs, so left them out.
 Last night we tried the sorbet and it got the thumbs up from everyone. My husband was impressed that it was so tasty, and bar the cup of sugar, was relatively healthy.
For the juice:
1/2 rockmelon (cantaloupe)
4 peaches
2 oranges
1 tablespoon lime juice
Juice the fruit according to the instructions for your juicer. For example, I have a different attachment for doing 'fleshy' fruits like the peaches and rockmelons and another attachment for juicing citrus fruits. Months ago I juiced a heap of limes and put them in the ice cube trays in the freezer. I picked out enough cubes of frozen lime juice to make about 1 tablespoon and added them to the rest of the juice.

For the sorbet:
Collect the pulp of the peaches and rockmelons from the juicer.

Once cool, stir into the pulp along with some passionfruit pulp and seeds (or omit if you don't like passionfruit).
Place into a shallow freezer proof plastic container and freeze. After a few hours (when it is almost frozen solid), pull out and beat, then place back into the container and freeze again. If you leave it longer (I left mine for two days!) and it is frozen solid when you pull it out to beat it, just let it sit at room temperature until it softens.
Many sorbet recipes say to whip raw egg whites into frozen mixture when beating it. With two young kids in the house I wasn't keen on using raw eggs, so left them out.

Tuesday, February 3, 2015
Peach, plum and fig smoothie - dairy free

The best things in life are free and free fruit can't be beaten. I made a delicious smoothie from some 'free' fruit that we had - yellow peaches that we had growing in our garden plus some our neighbours gave to us, white flesh peaches that a friend gave us, plums from the next door neighbour and some figs a neighbour that I only met today while walking past his house and striking up a conversation about his fig tree. I peeled the peaches and chopped them roughly, chopped the plums and the figs and blended these all until smooth. (My mum would love this as she has extolled the virtues of her Nutribullet to me in a previous conversation!). I also added some lime juice that I had frozen from limes given to us by the same friend who gave us the white flesh peaches...I don't know if I would add limes again, the flavour didn't quite go with the other fruits. You could change the amounts of each fruit to your own taste, but I did 2 x white flesh peaches, 1 x yellow flesh (Million Dollar variety) peach, 1 x fig and 1 x plum.
It was absolutely delicious an soooooo refreshing. I could have used my juicer instead of the blender, but I really wanted the advantage of having the fibre in the drink rather than just the juice.


Thursday, January 8, 2015
Getting zapped from your trampoline mat? An easy solution to stop getting static shocks from trampolines

We recently got our kids a second hand trampoline, but were disappointed when they jumped on it and started to get static shocks from it. Consequently our son now refuses to jump on what he described as the best present ever when we gave it to him. So my husband did some research on the internet to find a solution.
He found an easy and effective solution was to dilute fabric softener in water to the approximate ratio of one part fabric softener to 10 parts water. Put it in a spray bottle and spray evenly over the trampoline mat. Allow to dry.
This certainly fixed the problem for us, although needs to be reapplied after rain as it washes it away.
From what we've read, this seems to happen with nylon trampoline mats. We were disappointed as we were told it was a good quality, made in the USA mat. We may eventually replace it with a good quality made in Australia mat, and see if that makes a difference.
Until then, we will keep up with the fabric softener solution.
Wednesday, January 7, 2015
2014 Pauline's year in review
Another year has passed and I find myself reflecting on what I have achieved this year towards my goals of living a little more frugally while not compromising on quality of life, treading lightly on the earth and reducing waste.
I'll start off with my garden. In 2014 from my garden I picked: zucchini, basil, spinach, cherry tomatoes, tomatoes, parsley, rockmelon, pumpkin, lemons, lettuce, capsicum, mint, olives, eggplant, oranges, thyme, cos lettuce, leeks, carrots, mushrooms, snow peas, silverbeet, chives, garlic chives, pineapple sage, peas, coriander, beans, lemon verbena, red onions and plums. We didn't get any apples off our tree this year. The total amount of produce picked from our garden this year is 235.8kg, up from 125.6kg in 2013 and 104kg in 2012. This year I planted passionfruit so it will be a few years before that produces. Also last year I planted asparagus, so should hopefully start getting some off that next spring. We also planted a peach tree which has fruit on it and will hopefully be eating them in the next month or so. We also have a fig tree but it hasn't produced fruit yet.
I read a bit more about gardening tips including companion gardening. After three years of having a vegie patch, I have noticed the favourite spot in the garden for the basil...in the dappled shade from the next door neighbours peach tree. I also discovered that the coriander likes to be near the tomatoes and in the dappled shade of the lemon tree. I planted one coriander in the ground and it was going so well in that spot I moved the ones I had in pots to the same area and they thrived.
I have been noticing how much of our food comes in packaging and trying to cut down. I no longer buy pre-packaged carrots, but buy them loose and take my own plastic bag to put them in. Having said that, my favourite fruit and veg shop had all their peaches and nectarines in plastic containers this year that weren't particularly reusable or recyclable, which was disappointing. Hopefully next year we will have our own peaches and not need to buy so many.
This year I made my own dishcloths from old towels and scrap material and they have worked out really well. I am endeavouring to make more clothes for my family this year.
I hadn't updated this blog for about two years until one of the Channel 7 producers came across it while surfing the internet. The next thing I know I'm on television on the Today Tonight Adelaide show under the title of Urban Farmers. For some time afterwards hits on this blog skyrocketed but have slowed down a bit now.
With a 5 year old and an almost 2 year old, there doesn't seem to be a lot of time for making things by hand to reduce waste and live frugally. However, as the kids get older I have more time, so expect to be able to do a bit more this year, especially as my oldest starts school this year.
Thanks to all my friends who tell my of how I have inspired them to plant something in their gardens or go back to making things like candied peel themselves instead of buying products. And thanks to my Facebook followers who have spurred me on to greater things.
I don't tend to make new years resolutions as I'm not good at sticking to them, but I will continue on this journey and will post onto this blog when I get a moment. I hope you all have a great 2015!
Tuesday, January 6, 2015
Dairy free lasagna

When my daughter was an infant, she was diagnosed as being Cows Milk Protein Intolerant. She grew out of it at about 18 months of age, but for what seemed an eternity (as I love my dairy) I was making dairy free meals and snacks. A few days ago I made this for a friend who thinks that her newborn baby may also be cow milk protein intolerant.
I'm not going to reinvent the wheel here by giving a full recipe for making lasagna, as it's really only the white sauce that is different from ordinary lasagna. So make the sauce for the lasagna the usual way.
When making the white sauce, substitute the butter or margarine for a non-dairy alternative, such as Nuttelex. You can also substitute the milk for rice milk. I tried using oat milk and almond milk but found rice milk to be the best. Note that as the soy protein and cows milk protein are very similar in structure, so often people who are cows milk protein intolerant are also soy protein intolerant, so don't use soy milk if that is the case for you.
30g Nuttelex
2 or 3 tablespoons plain flour
350ml rice milk
Melt the butter. Add the plain flour, stir until combined and "cook out" the flour (the flour will go pale in colour). Add the milk slowly and stir until there are no lumps. Cook until mixture thickens. You may find this takes longer to thicken than ordinary white sauce and even when it has thickened I find it is still a bit watery. I do this process in a microwave safe jug and it takes about 7 minutes.
Layer the lasagna in the usual way. I put a thin layer of white sauce in the middle layer of mine and then put the rest on top. As there is no cheese in this recipe, to give the topping a bit colour I sprinkle on some paprika.
I won't look as yummy as ordinary lasagna but will still taste good.
Saturday, January 3, 2015
Best ever Christmas Fruit Mince Pie recipe
I know it's a bit late, now that Christmas has passed, but I finally have a few minutes to type up the Fruit Mince Pie recipe that I make. It's actually a combination of two recipes. The fruit mince is my mum's recipe and the pastry is a Maggie Beer recipe that I got from the Women's Weekly magazine. For years I used a different pastry recipe, but found this one had the right amount of "crumble". I love a crumbly pastry on my fruit mince pies...not too crumbly but not too leathery either.
The fruit mince recipe makes a lot of fruit mince, much more than the pastry recipe does. I would recommend either making 3 times the pastry recipe if you want to use all the fruit mince or, alternatively, freeze the fruit mince so you can make some more pies later on and that way you always have fresh fruit mince pies available.
So here goes, shame I didn't take a photo of them before they were all eaten up!
Pastry
1.5 cups (225g) unbleached plain flour
half cup (75g) self raising flour
one third cup (55g) icing sugar
150g cold butter, chopped
1 free-range egg yolk
2.5 tablespoons iced water
Process the flours, icing sugar and butter in a food processor until well combined and the mixture resembles breadcrumbs. Add the egg yolk and iced water and process using the pulse function until the mixture starts to come together. I find that at this stage it is quite crumbly and I need to bring it together by hand. Shape the pastry into a disc and wrap it in plastic wrap and refrigerate for 1 hour.
Fruit Mince
1 grated apple
grated rind and juice of 1 lemon
125grams chopped dried apricots
1 cup sultanas
1 cup currants
1 cup sugar
half cup water
Place all ingredients into saucepan. Slowly bring to boil. Simmer for 10 minutes or until liquid has reduced to a thick syrup. If it is too watery, it will make the pastry soggy. Allow to cool before filling in the pastry cases.
Pre-heat the oven to 210 degrees celcius (approx 420 degrees F if you have an old oven like me!). Roll out the pastry until 3mm thick. Using a biscuit or scone cutter, cut circles large enough to cover the base of your muffin tray. Don't forget to prepare your muffin tray first if necesary. Line the holes with pastry circles and put spoonfuls of the filling in the cases. Cut slightly smaller circles in the pastry and place these lids on top of the pie filling, pressing down on the edges to bring it together. Cut a cross into the tops of the pies to let the steam out.
Bake for about 12 minutes or until the pastry is golden brown. All to cool in the trays and serve dusted with icing sugar.
These are absolutely delicious. The pastry recipe has been copied from the Australian Women's Weekly magazine, November 2012 edition.
Subscribe to:
Comments (Atom)