We are looking to get our kids a trampoline for Christmas. I have been searching Gumtree and Ebay everyday for a 2nd hand trampoline, but have also been researching brands on the internet and reading lots of reviews. Basically what I have found is the old saying of "You get what you pay for" is largely true.
Looking at trampolines that my friends have bought and what I have read on reviews, it seems as though if you buy your trampoline from a department store (eg Target, Big W, Kmart), you are getting a product built to a price rather than a standard. The reviews on brands sold by these stores, such as Gametime and Action Sports all complain of the same things; mats/padding/nets not even lasting a year, customer service difficult to deal with, assembly instructions inadequate or translated from another language into English. One website I found yesterday gave an in depth report on the structure of the Action trampoline, how it moved about while being jumped on, the uneven bounce of the mat which may result in injury and the author said they felt it wasn't very safe. Many review websites feature complaints from people vowing never to buy those brands again. Occassionally some say they are happy with their purchase. Most trampolines are kept out in the weather, so there will always be some wear and tear, but from what I have read, the better brands last longer as they have better UV and rain protection.
Trampolines bought from a trampoline shop or on-line trampoline shop fare much better in the reviews. If you are looking for a trampoline, look out for ones that say the mat is made in the USA or Australia, as these seem to be the best. The mats last years compared to cheaper ones, even when kept out in the weather. I have read good reports on Oz Trampolines, Vuly and Jump Start.
99.9% of the trampolines I have seen on Gumtree have been bought from one of the above mentioned department stores. All of those are only a year or two old and need bits replacing. I found one that was bought from a trampoline on-line store with a mat made in the USA. The padding and net need replacing but the owners have had it for quite a few years and their girls still jump on it everyday. Only getting rid of it to buy a bigger one. I can get replacement padding and nets relatively inexpensively from Oz Trampolines and Jump Start. My husband is planning to go and have a look at it on Saturday to see if his opinion of it is the same as mine. If so, then we will probably buy it and get the bits replaced. The mat is in excellent condition. If it works out and all goes to plan, we should have a good quality trampoline (with new net and padding) and it only costing us less than $200.
Ours will also be out in the weather.
Wednesday, December 3, 2014
Sunday, November 23, 2014
Microwave herb drying
I read an article recently in the Grass Roots magazine about how to dry herbs in your microwave. I had a go with Corriander and it worked really well. Here is how it goes:
The article is written by Carol Fletcher and she suggests picking the herbs early in the morning when they are fresh. If you water them the night before, you probably won't need to wash them when you pick them, as all the dust and dirt will have been washed off them with the watering.
Pull the leaves off and Carol suggests putting the leaves in piles of similar sized leaves. Although I found it worked ok putting different sized leaves together, just refer to my tip a bit later in this piece.
Place the leaves on paper towel and place another piece of paper towel on top. Put this carefully into the microwave. If your microwave is 1100watts, microwave on high for 2 mins, longer may be needed if your microwave is not as powerful. Carefully lift the paper towel with herbs out and flip it over. Place back in the microwave and give it another minute on high.
Take them out again and remove any leaves that have gone crunchy. Any that are still damp, put back in the microwave and give them 20 second burst until they are crunchy. If you put in different sized leaves like I did, smaller ones will go crunchy first. Each time pull out the ones that have gone crunchy so they don't burn.
Carol suggests that each time you dry herbs, use fresh paper towel so you don't transfer the tastes. So if you are doing basil followed by parsley for example, you would change the paper towel.
Store them in air tight containers. I picked a heap of corriander and dried them for use when my corriander is out of season. I found it is a quick way of drying herbs when you only have fresh herbs but the recipe you are making at them time requires dried herbs.

Lazy gardening tip: let it go to seed
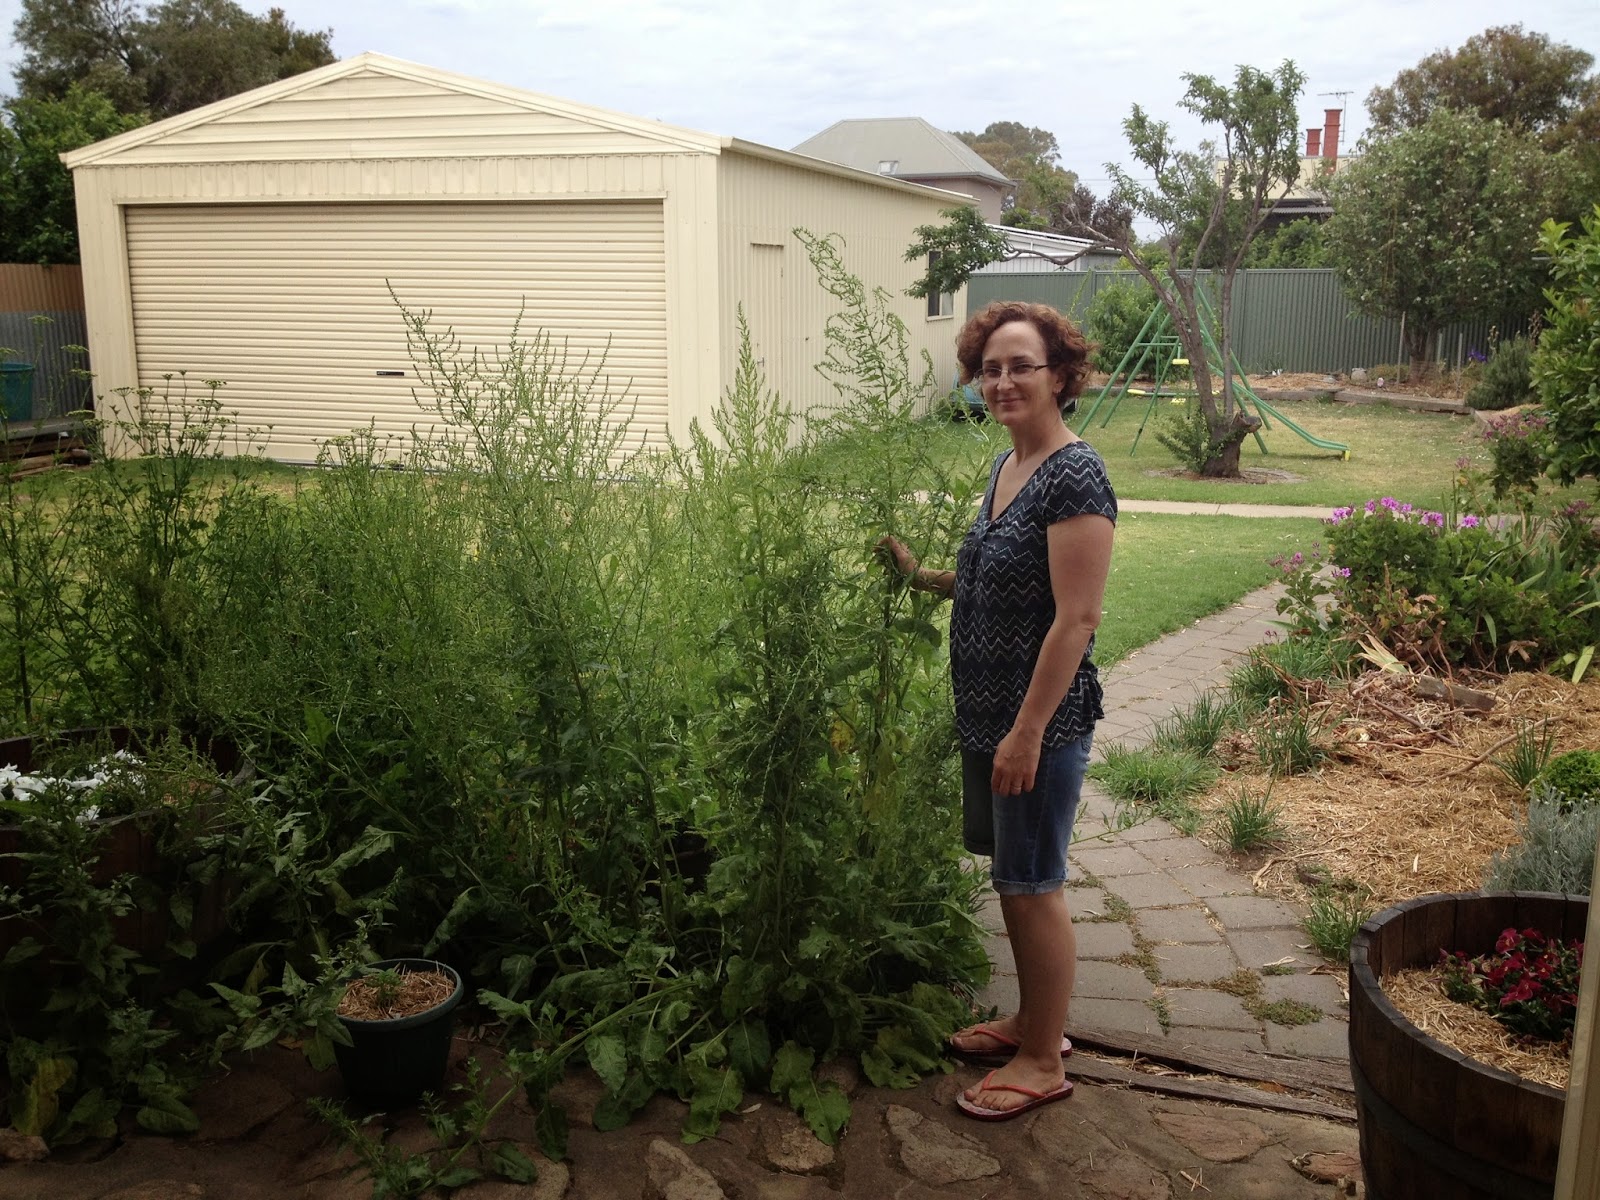
There's an old saying; one years seeds, seven years weeds. Well, the same could be said for my gardening technique. A few years ago when I was setting up my vegie patch, my mother-in-law planted some spinach in a pot for me. Each year I let it go to seed and watch with interest where it takes hold. I do the same with my parsley and lettuce. The only assistance I give them is occassionally when I am walking past I will grab a handful of seeds and scatter them somewhere else in the garden. I have much more luck with this lazy form of gardening than I do with seeds that I have planted according to the instructions on the packet.
In this photo I am standing next to my spinach and silverbeet which is going to seed. On the left of the spinach and silverbeet are some parsley, also going to seed.
Picking produce grown from plants that have self seeded is the closest thing to having a free lunch. I water the plants and put some seaweed extract and organic fertilizer on them, and that's pretty much all the attention they get from me...apart from picking the snails off them.
I find that the plants grow very well, perhaps it has something to do with nature deciding where they will grow best in the garden rather than interference from me. That's the way I prefer my garden to grow.
Wednesday, November 5, 2014
Teaching our children to speak...and avoid the speech pathologist!
On my daughters last visit to the pediatrician, he was impressed with the size of her vocabulary and that she was already talking in sentences. This was normal for me, as my son had an equally large vocabulary at the same age. The doctor commented that he is seeing an increasing number of children requiring a referral to a speech pathologist. So why is this so?
Now, I'm not a speech pathologist, just a parent who had two children considered early talkers. I never set out to have early talkers, I just wanted to help my children communicate their needs. So, I'm not an expert, but here is what I did.
Firstly, when pregnant with my first child, baby signing was recommended to me as a way of teaching children to communicate to avoid them having tantrums when they can't express what they want. My husband and I bought a book and read about it. We did read that children who do baby signing usually end up being early talkers, but that still wasn't our inspiration. When our son was born, we started doing baby signing from day one. For those of you not familiar with baby signing, you do "signs" for a few basic words (eg; milk, change nappy, drink, hot, dog) and use these whenever you are talking to your child. You don't actually teach the words as a lesson, just use them in context. For example, the action for milk is the same as milking a cow, so when you ask them if they would like some milk, you do the action at the same time you say the word.
Eventually they start to do the signs, and quickly learn the word that goes with them. Once they learn to say the word, they drop the signing as it's no longer required. They then want to learn more words and signs to give more meaning to their communication. They go from wanting to tell you they can see a dog while out walking to wanting to tell you it's a big dog and they want to pat it.
Both of our children did their first sign at 7 months. I can't tell you how much of a relief it is that a child can sign "milk" when they aren't well and grizzly and you are trying to work out what to do to stop them crying! I remember one night getting up to my son in the middle of the night to him signing "hot" and "milk". I took his temperature and he had a fever. I gave him some panadol and a breast feed and he settled back down quickly. I wonder how long it would have taken me to work out what was wrong if he couldn't sign, as he couldn't yet say those words?
Secondly, as my son was approaching toddlerhood, I read a book about Neuro-Linguistic Programming as a method of avoiding the terrible twos. I didn't know at the time, but was told later by a speech pathologist that I met, that one of the activities I did from the book contributed to him learning to speak. The book advised that each time an instruction is given, keep the wording brief, as otherwise all the child will here is blah, blah, blah instead of the important words. So "Your nappy's wet, let's go and change your nappy'" becomes simply "Change nappy." (I would also do the baby sign for change nappy).
A game you can play with your child is put three objects in front of them, for this example I'll use farm toys. Pick each item up and simply say its name. Then pick each item up one at a time and say "Mum pick up cow" then using the child's name say "(name) pick up cow". Once they pick it up, give them positive feedback (yay, clap hands). This activity was in the NLP book and also mentioned by the speech pathologist.
I found that once they learn to talk, other concepts start to fall into place. My daughter is 20 months and can name colours and is learning to count. My son was the same and consequently learnt maths very early on (and now is a little obsessed with numbers). With my son I was constantly stopped in the supermarkets and asked why he wasn't at school, and usually the person asking was surprised when I said he wasn't old enough. I can expect the same for my daughter as she gets a little older as she talks just as much.
The other day my husband took the kids for a walk. When they returned my daughter said "Walk dad, I see pussycat, I see dog walking with lady."
The upside to having children who are early talkers are that they find it easy to communicate. The down side is that once they start talking....they don't stop!
Tuesday, November 4, 2014
Tips on using scrap material to make new clothes
Do you have a pile of scrap material in your sewing stash? I have, and am endeavouring to reduce the size of the pile to make more room in my cupboards! Included in my scrap material stash was some lovely "vintage" material given to me by my best friend. I sorted through my patterns until I found something I wanted to make, then sorted through the scrap material she sent me until I found a piece big enough to make the pattern.
 Here are my tips for using scrap material when sewing:
1. When I laid the material out, I found that the selvedge on one side was missing. To make up for the missing selvedge, I folded the material in half lengthways and using my measuring tape, carefully measured the width of the material. The width of the material needed to be equal all the way along. Mark a line along where the existing selvedge lays along the material and cut off the excess. This new cut edge becomes the missing selvedge.
2. The grain line. If the pattern piece you are wanting to trace onto your material has a grain line, and you are missing one selvedge, measure the grain line (on both ends of the line) from the one selvedge that you do have.
3. Don't have enough to make the pattern? Considering using a contrast material. Fortunately for this pattern I had enough material.
4. What else is in your stash that you can use? I looked in my sewing supplies and found some iron-on embroidery that matched perfectly, as well as cotton and buttons the right colour and elastic for the shorts. The only things I didn't have (a good excuse to go to Spotlight - not that I ever need an excuse!) was some matching trim and overlocker thread in the right colour.
Now I have a gorgeous outfit for my daughter and can't wait for her to try it on. The only mistake I made was sewing the trim on in the green cotton that was already loaded onto the sewing machine, I should have used white. I hope it is a little on the large side when she tries it on so that she can get two summers out of it. It's a shame to make lovely clothing for children to outgrow them in a few months. Oh, and if anyone has scrap Peppa Pig material, send it my way!
 And when did I find the time to sew with two small children around! Well, the house hasn't been cleaned for the few days while I made this and the children have entertained themselves to some degree. Fortunately the eldest had kindy today and the youngest is having a daytime sleep!

1. When I laid the material out, I found that the selvedge on one side was missing. To make up for the missing selvedge, I folded the material in half lengthways and using my measuring tape, carefully measured the width of the material. The width of the material needed to be equal all the way along. Mark a line along where the existing selvedge lays along the material and cut off the excess. This new cut edge becomes the missing selvedge.
2. The grain line. If the pattern piece you are wanting to trace onto your material has a grain line, and you are missing one selvedge, measure the grain line (on both ends of the line) from the one selvedge that you do have.
3. Don't have enough to make the pattern? Considering using a contrast material. Fortunately for this pattern I had enough material.
4. What else is in your stash that you can use? I looked in my sewing supplies and found some iron-on embroidery that matched perfectly, as well as cotton and buttons the right colour and elastic for the shorts. The only things I didn't have (a good excuse to go to Spotlight - not that I ever need an excuse!) was some matching trim and overlocker thread in the right colour.
Now I have a gorgeous outfit for my daughter and can't wait for her to try it on. The only mistake I made was sewing the trim on in the green cotton that was already loaded onto the sewing machine, I should have used white. I hope it is a little on the large side when she tries it on so that she can get two summers out of it. It's a shame to make lovely clothing for children to outgrow them in a few months. Oh, and if anyone has scrap Peppa Pig material, send it my way!

Saturday, October 25, 2014
When to be frugal and when to say "Hang the expense!" - Buying school uniforms.
My eldest starts school next year so this week I went to a parent orientation night at the school. One of the items on the agenda was uniforms, and they had a small display there. There are two options - you can buy the school uniform from the school or buy standard uniforms from department stores and just buy the logo from the school to sew onto the clothes. Another option would also be that you could make the clothes yourself in the approved colours and put the school logo on.
If I wanted to be really frugal I could have gone with the option of buying cheap imported clothes from a department store or made them myself. However, this was one time when I went "Hang the expense!" and bought the clothes from the school.
There are many times, when we are trying to save money and avoid waste, that we chose to go for the more expensive option. My husband and I decided to buy the school uniform and school bag (a backpack designed by the school to suit the needs of their students - they even gave a demonstration of what items go where in the bag) for the following reasons.
1. Time factor. Yes, I would love to make the clothes myself, but I don't envisage having the time to make the items I can make between now and the end of January when school starts, what with Christmas in between and having a younger child at home. I may get to make one pair of shorts to have as a spare pair in his bag, but to make three pairs of cargo shorts with zippers in that time might be a big ask.
2. Capability factor. I can make the shorts and bucket hat myself, but the particular style of the polo shirts would be beyond what I am capable of making, so the only option would be to buy the shirts anyway. I certainly don't have what it takes to make the fantastic school backpack that they have on offer, either.
3. Value for money. I was impressed with the permanent pleat cargo shorts, although imported, looked good quality. The polo shirts are made in Australia. The bucket hat also imported. The bag is very good quality (I don't know where it was made). I bought the bag, one hat, three shirts and two pairs of shorts, and it cost $154.00 which I thought was pretty good. The individual items were priced not much more expensive than the department stores, so I wouldn't have gained much by shopping elsewhere by the time I would have had to buy the school logos and sew them on. I'm hoping that when my second child starts school, these items will still be good enough for her to wear to make it even better value for money. Unfortunately I don't know anyone with older children at the school to have been able to have uniforms handed down to us like some of the other parents waiting at the uniform shop had.
4. One stop shop. I got all his uniform needs in one place, without then having to head off to a department store and then back to the school to buy logos. Time is money, as they say.
5. Blending in with everyone else. Standing outside the uniform shop waiting for it to open (it's on the school site) I noticed all the students wearing the regulation school uniform shirt. At least by buying the uniforms there, my child(ren) will be wearing the same as everyone else. Shorts are not such a big deal, as they don't stand out as much as a shirt, so even if I do get time to make a pair in the right colour it won't be noticeable.
My son has always been excited about starting school next year, however after our trip to the uniform shop, he skipped the rest of the way to Kindergarten!
Monday, October 20, 2014
Book review: "Backyard Self-Sufficiency" by Jackie French
I love my local library. It is such a wonderful resource, not only for the great range of books and cds, etc that you can borrow from it, but it has a toy library and runs lots of general interest activities as well as programs for kids. But enough of that...here's a little gem I borrowed from my library last week, and will be reluctant to return it when it is due.
"Backyard Self-sufficiency" by Jackie French is inspiring right from the first few pages. Lately I've been reading quite a few books and magazines about self-sufficiency, permaculture and other related topics and the thing that impresses me the most about this book it that it's realistic. Many people wanting to aim for a more frugal and/or self sufficient lifestyle want to take small or realistic steps in achieving that goal, unfortunately many books and magazines can frighten you off by demonstrating models of total self sufficiency. Jackie mentions having to make her own soap, toothpaste and other products when she didn't have much money but says if you don't need to make them then why would you? Having looked at quite a few methods for making soap with the notion of making my own, but being dismayed that all soap making methods require wearing a mask and gloves at some stage in production, I decided it was best left to the soap makers.
It is such a delight to read that within the first few pages it had me wanting to rip out large sections of my lawn in the back yard and planting more "stuff". Reading what she does with her vegies and fruit has filled my head with ideas.
I also love her 'no-dig' method of gardening. It certainly fits in with my 'lazy' attitude to gardening. I have already been out in the yard and spread sheets of newspaper covered with glass clippings. As her book is Australian, the information in it is certainly relevant to our conditions. Often books are written overseas where the conditions and climate are different, and plants behave differently.
There is so much more I could say about this book, but do yourself a favour, and pop down to your local library and have a read yourself!
Thursday, October 9, 2014
Myth busting.... it costs more to buy local
I've long held a belief that it doesn't really cost more to buy locally produced products. Not much more, anyway. I remember hearing an interview with Dick Smith when he talked about a jam producer he was helping whose product cost 30c more than the imported competitors product on the shelves in supermarkets. I always prefer to buy Australian made and owned using Australian grown produce, as I find the quality is better, taste is better, etc. So I don't really think I pay much more for Australian products than imported ones generally.
We went camping this week in the lovely Riverland in South Australia. We stopped by at a roadside fruit and veg vendor between Berri and Glossop and I was pleasantly surprised to find they grow their own nuts. Often I find it hard to buy nuts that say 'Australian grown'. So I bought one bag of almonds, one bag of cashews and one bag of pistaccios. We bought some dried fruit as well and a butter nut pumpkin, all of the produce was grown on that particular farm. I handed over the money and realised I paid probably the same for the nuts as I would for imported ones in the supermarket. And to top it all off, the lady gave us two large grapefruit as a thank you.
I slept well that night knowing that I not only supported a local farmer, but my dollar was staying in the area and the food miles were low as the stall was right out the front of the farm.
Wednesday, October 1, 2014
New life for old towels
We like to go camping, but everytime we go I have to get hand towels, etc, out of our linen cupboard to take with us. I read an article in a Grass Roots Magazine edition about using old towels to make hand towels and face washers. I had some old towels that I was thinking of giving to my husband as rags for use in the shed, so I got them out. This is also a great way to use up any scraps of material that you have.
Firstly, cut the towels to the size required and trim off any frayed bits. I made two different styles - on some I cut a piece of scrap material the same size as the piece of towel and layed the material and towel right sides together. I then overlocked three edges together, turned the material and towel right sides out, attached a ribbon to use as a hook and sewed the open edge together.
The other style was to use either a strip of material, wide ribbon or bias binding to create and edging for the towel.
As I was making these for use when camping, I wasn't worried if the material, cotton thread and ribbon didn't match the colour of the towel. When I make some for use in the home, I will be a bit more selective.
What I ended up with are some new hand towels and smaller cloths that can be used as dish cloths or cleaning cloths. They all have a loop of ribbon on them so they can hang up somewhere. Much better than using them as rags or sending them to the compost or rubbish bin!


Sunday, September 28, 2014
Home made inspect spray for the garden
Back in October 2011 I promised that I would put this recipe on my blog when I found it. This is a really handy recipe as not only does it help to keep unwanted pest insects out of the garden, but it you can adapt the recipe to use up kitchen scraps.
Ingredients: 4 large chopped onions, 6 chopped garlic cloves, 1tbsp hot chilli powder, 2 cups pure soap flakes or pure grated soap.
Method: Combine onions, garlic and chilli powder, cover with water and stand for 24 hours. Strain. Mix in soap flakes or grated soap into onion mixture. Dilute mixture 2 parts mixture to 5 parts water. Will keep for 2 weeks in a cool, dark place.
As an alternative to using perfectly good onions and garlic cloves, I often use the off cuts from food preparation. I use the equivalent of the above measurements in onion skins and garlic skins and any bits that are cut off (such as the tip of the garlic or bits of onion that have gone soft).
You will need to give the mixture a good shake before you use it each time as the soap flakes tend to settle a bit. You could use chopped chillis if you have them rather than chilli powder.
Monday, September 22, 2014
Construction Theme Birthday Party Cake
I was really glad when my son picked out a construction theme birthday party cake from one of the Australian Women's Weekly cake decorating books as it looked really easy to do. It was pretty simple, just make two cakes and stick them together (one on top of the other) with icing. Cut into the top cake to create a hill. Cover with icing and crushed Violet Crumble, decorate with construction toys. Put some choc coated sultanas around to look like rocks. I found that this worked well for a beginner cake decorator like me, as it didn't matter if some cake crumbs got into the icing or if the icing ran a bit... construction sites are messy places anyway!

Construction theme birthday party pinata
My son is about to turn 5 and he had his party on the weekend. We made a Stop/Go sign pinata by using thick cardboard and cutting two large circles as the two sides. Then we cut a strip of cardboard and used packing tape to stick it around the edges, making sure to put a hole with some string in at the top and filling with lollies before taping it all up. Lastly my son and I had fun painting it. I wasn't sure how strong it was and was surprised to find it took quite a whacking before the contents spilled out! It was so easy to do and better still we used cardboard that would have only been thrown out and some packing tape we had at home. All we had to get was lollies and a bit more paint. Pinata's are about $20 in the shops, but I only paid about $10 for a bag of lollies and one of chocolates. My advice would be to only use one bag and it turned out we had far too many lollies/chocolates in ours for the number of kids that we had (10).

 The best thing about this, it didn't matter that it didn't look perfect, my son still loved it!


 The best thing about this, it didn't matter that it didn't look perfect, my son still loved it!
Tuesday, September 16, 2014
Home made air freshener
I'm going to give this a go the next time I need air freshener!http://www.instructables.com/id/Homemade-Air-Freshener-Gel/?download=pdf
Jolly Santa Advent Calendar
In previous years I have been disappointed in buying advent calendars. While very cheap, the chocolate that comes in them is the size of a 5c piece and at the end of it all you are left with is some packaging. Last year I made my own using Jolly Santa material. It was a bit rough and ready but my kids loved it as the pockets are big enough to put a small toy, holiday craft activity to keep the kids busy and some home made treat. This year my husband suggested getting a small lego model and putting some of the bricks in each day so day by day the kids can construct the model. This year I made one for my best friends kids and took much more care with my measurements and sewing. I took photos as I did it and wrote down the instructions, so if you would like to make it, here it is.If you have trouble copying and pasting this into your browser, email me at paulinestips@gmail.com and I will email you the document. https://docs.google.com/document/d/1AkgrmKD8FLIDNAUL3hG8gMG4YzwhjxPBZkT6XZ4FNOc/edit?usp=sharing


Sunday, September 14, 2014
Sunrisesister.org
I have just added a new blog link to My Blog list. Sunrisesister is my sister-in-law, Charlotte. She has some fantastic ideas on things to knit, recipes to cook and other crafty ideas. Check it out, you'll love what she has on there.
Garden update...200kg of produce and counting!
Three years ago I planted a vegie patch. The first year I got 104kg out of my garden and was pretty excited. Last year I got 120kg and was even more excited. Yesterday I picked the last of the tomatoes as well as some oranges and was extremely excited when I weighed the days takings and found that my garden has produced 200kg this year so far (and it's only the middle of September!). I have a set of kitchen scales and I weigh everything I pick so that I can keep a record of how economical my garden is.
I spent the weekend digging out unwanted flowering plants as well as the tomatoes and pumpkins that have died off. I went out and bought the following seedlings: rockmelon, watermelon, corriander, sweet basil, zucchini, tomatoes (4 varieties, one seedling of each...I do it each year), cherry tomato, peas and beans. I had some corn seeds that I got from the Adelaide Royal Show and some pumpkin seeds that I saved from the last pumpkin picked out of my garden. I don't usually have much luck growing things from seed, apart from parsley and lettuce that self seed in my garden, so will be looking out to see if the corn and pumpkin germinate. If not, it will be a quick trip down to the nursery to get seedlings. I also bought some manure and sugar cane mulch. I love the smell of fresh sugar cane mulch on the garden! I had a very busy day yesterday, with lots of soil preparation and planting. I didn't get to plant the rockmelon and watermelon as I have to remove the grass that has grown in the spot where I will put them. I will have to do it sometime in the next week.
Does it cost much to set up a garden? Yesterday the mulch, manure and seedlings (and Seasol spray) cost me about $130.00. Not bad considering how much I will get from it in regards to zucchinis and rockmelons, etc. It will pay for itself over the season.
My husband got me some editions of the Grass Roots Magazine from the library and I read an interesting article about how much food is NOT eaten from our vegie patches. The author started going out each day and picking produce from their garden and making a point of using it in a meal. It didn't matter if it was one spear of asparagus and a few leaves of lettuce, it still went towards a meal. I think I will give this a go, as I find there is so much in my garden that doesn't get used. My cos lettuce are huge, so I think I will pick some today and maybe make a Caesar salad for dinner. I also have a lot of spinach and silverbeet, so will pick a few leaves and make something with them (and pick the snails off them at the same time).
I am also excited that the asparagus that I planted last year has shown a new lease of life this year. After I planted it my husband and I moved it just as it was dying off at the end of the season as it was where my husband wants to plant a fig tree. After transplanting I cut it back to ground level. Recently we looked at it and declared it dead, as it certainly looked that way. A week later Spring started and new spears popped out from under the ground!
Sunday, September 7, 2014
Growing cos lettuce
In Autumn I planted 6 cos lettuce seedlings as I love cos lettuce, especially in a caesar salad. They have grown really well in a position where they get the winter sun. There is something I discovered which has increased their economic value in my eyes. I found that if I removed the leaves without pulling out the stump and roots that they grew a new lettuce head from the old stump. Consequently I now have more cos lettuce than I can keep up with. I recently gave some large leaves to a friend who has a rabbit. I now know that I can pick the lettuce leaves while they are still relatively small (I prefer them that way rather than too big) and still have some left for another meal. My only question is, when do they die off? Do they die off in Summer? Mine are still looking good as we have moved into Spring. I am wondering if I should let one go to seed the same as I do for the other variety of lettuce that I have growing in my garden. With the other lettuce, I planted it years ago and ever since then I let it go to seed and just watch to see where in the garden it will pop up next. Since the first planting I have never had to plant it myself, it self seeds/germinates around the garden! I'm hoping to do the same with my cos lettuce.
Friday, September 5, 2014
What, no potato? Substituting potato with home grown pumpkin in my Chicken and Leek Cobbler
I recently went to make a favourite dinner of mine...Chicken and Leek Cobbler...only to discover there were no potatoes in the pantry. However, I still had some of my home grown pumpkins that needed using up. So I had a go at substituting potato for pumpkin, with great results.
Here is the recipe.
50g butter; 1kg free range chicken breast fillets, cut into strips; 1 large leek, trimmed and finely sliced (I used home grown leeks); 1 stick celery, finely sliced; 1 tablespoon plain flour; 1 cup chicken stock; 1 cup cream; 3 teaspoons Dijon mustard (although I actually used Beerenbergs Bavarian Mustard which is lovely).
Topping - 400g potatoes or equivalent in pumpkin; 1 1/3 cups self raising flour; 1/2 teaspoon salt; 1/4 cup grated mature Cheddar; 100g cold butter, chopped; 1 egg yolk, lightly beatedn to glaze.
Melt half the butter in a pan. Add the chicken and cook until golden. Remove from pan. Add remaining butter and cook the leek and celery until soft. Return the chicken to the pan.
Sprinkle flour over chicken mixture and stir for 1 min. Remove from heat and stir in stock and cream. Mix well to avoid lumps. Return to heat and bring to boil, then reduce heat and simmer for about 20 mins. Add mustard and season with salt and pepper to taste. Transfer mixture to 1.25 - 1.5L casserole dish. Preheat oven to 200 degrees celcius.
To make the topping, steam or boil pumpkin until tender. Drain and mash until smooth. Place flour and salt in food processor and add cheese and butter. Process in short bursts until mixture is like breadcrumbs. Add this to pumpkin. If mixture is too sloppy, add more flour (pumpkin tends to be more moist than potato). I added rice flour which gave the end result a lovely texture. Bring together with your hands to form a dough.
Roll dough onto floured board and roll out until 1cm thick. Use a scone cutter to cut circles into it.Keep rerolling pastry and cutting circles until all pastry is used up. Carefully lay the circles over the chicken and leek filling, overlapping the circles.
Brush the dough circles with egg yolk with a little milk mixed in if needed. Bake about 30 mins or until dough is golden.
Absolutely delicious! This recipe is adapted from Family Circles Step by Step Quiches, Pies and Tarts


Home made pepitas from my home grown pumpkins
With all the pumpkins I have had out of my garden this year I wish I had started making pepitas earlier when I still had plenty of pumpkins left. Better late than never, I looked up how to make pepitas (roasted pumpkin seeds) on the internet to see how it was done. There were a number of ways to roast them, so I thought I would give it a go and see which way works out best. I have tried one way so far, with different seasonings.
Firstly, rinse the pumpkin seeds. Some websites said you have to be meticulous, while others said it wasn't so important to get all the pumpkin 'guts' off. I laid them out on some paper towel to dry and patted them dry a bit as well. Then I took away the paper towel and laid them on a baking tray to completely dry overnight.
 The following day I placed them in a bowl with a little drizzle of olive oil and mixed them together with some salt. The second time I made them I also added smokey paprika. Then I laid them out on the baking tray again and baked them at about 150 degrees C (300F)until they were a light golden brown. I think this took about half an hour.
This method made pepitas which are pumpkin seeds still in the kernels (unlike the ones from the shop which have been shelled). They were crunchy and delicious. Another method which I haven't tried yet is to boil them in salted water before laying them on a baking tray to dry and roasting them.
You could flavour them with any seasoning you like I guess. I hope to try things like chilli flakes and garlic as well. If you've made them before, let me know what method you tried and if it worked for you.
The following day I placed them in a bowl with a little drizzle of olive oil and mixed them together with some salt. The second time I made them I also added smokey paprika. Then I laid them out on the baking tray again and baked them at about 150 degrees C (300F)until they were a light golden brown. I think this took about half an hour.
This method made pepitas which are pumpkin seeds still in the kernels (unlike the ones from the shop which have been shelled). They were crunchy and delicious. Another method which I haven't tried yet is to boil them in salted water before laying them on a baking tray to dry and roasting them.
You could flavour them with any seasoning you like I guess. I hope to try things like chilli flakes and garlic as well. If you've made them before, let me know what method you tried and if it worked for you.


Make your own pinata
Brendon wants a pinata for his construction theme birthday party, but I refuse to pay $20 in the shops for one! So this morning I looked on the internet for instructions on how to make one. I found this site http://www.kidspot.com.au/how-to-turn-a-cardboard-box-into-a-pinata/ and will make one either in the shape of a construction helmet or traffic cone (as per my almost 5 year olds wish). When I do I will post photos so you can see how I made it.
Wednesday, September 3, 2014
Tuesday, September 2, 2014
Nuts and bolts recipe
This tasty snack is an adaptation from a recipe that my sister makes. The original recipe calls for Nutrigrain, but I didn't have any so used wholegrain Cheerios instead. If anyone has any suggestions on flavourings I can use instead of packets of soup mix please let me know on paulinetips@gmail.com or post a comment.
Ingredients:
1 packet French onion soup
300g peanuts
1 packet Dutch curry and rice soup
1 packet pork or plain noodle chips (I used cashew bar mix for this one)
300g sultanas
1/2 cup oil
300g Nutrigrain (or wholegrain Cheerios)
Mix all ingredients together. (How simple is that?). This keeps for ages in an airtight container and is great for parties. Omit the nuts for allergies if required.

No garden? No worries! Indoor edible plants
Here are some ideas for growing edible plants indoors. Mushroom kits are great and cost about $20. Mine is in the laundry and the mushrooms taste great. You can also grow alfalfa or cress in your kitchen. My son's kindy grew cress in plastic yoghurt containers with cotton wool. It now sits on my kitchen bench ready to use. If you have any other great ideas add them here or email paulinestips@gmail.com


Sunday, August 17, 2014
What's been happening in my garden...and my life
I was prompted today, by someone who saw my blog and sent me an email, to give everyone a little update. I was amazed when I logged on to see that it has been two years since I have updated my blog! My how time flies! In that time I had another child, so have been too busy chasing my 1 1/2 year old and almost 5 year old around to have time to sit on the computer. My old computer was pretty slow, which also made updating my blog hard.
Never mind that, some amazing things have been happening in my garden. In 2012 my garden reaped 104kg, and I was impressed! I figured that at an average of fresh produce costing $3.99/kg, my garden had made about $400, and only cost about half of that to set up (compost, manure, reticulation, seedlings to plant, mulch).
So I was pretty excited to get 120kg in 2013.
And am jumping out of my skin with 2014 total to date being a staggering 180kg! And there's still 4 months of the year to go! I estimate that I still only spend about $150 to $200 on manure, mulch and seedlings each year, so the profit margin is getting better. Some of the things I planted in 2012 have grown bigger and producing more, while other annuals self seed and pop up all over the garden the following year...just like my lettuce plants.
The pumpkin season has just finished, and this year I reaped about 60kg of pumpkins. The last 3 pumpkins are sitting on my kitchen bench waiting to be made into pumpkin soup and go into the freezer for those quick meals on busy nights. Also doing well in my garden at the moment are my lemon tree and cos lettuce.
Last spring I planted rockmelons and we did really well out of them. So this spring I will be planting rockies again. I also plant zucchini's every spring as we always do well out of them.
I have used the peel from my oranges to make candied peel and am planning to do the same with lemon peel so I can be ready to make the Christmas cake in a few months. I tried making preserved lemons but don't really see myself using them much so probably won't be doing them again.
Unfortunately the big winds we had a few months ago knocked all our olives off the tree, so I only got one jar of olives off the tree this year! I am running out of preserved olives from previous seasons, so may have to resort to buying olives until the tree bears fruit again!
I hope to update this blog soon with more recipes, tips for making clothes, preserving fruits, etc over the coming months. I have a great Christmas Advent calendar that I made last year to put on here to show everyone. Your kids will love it as the pockets for each day are big enough to put a small toy or activity in. Much better than the shop bought ones that only have a small chocolate in.