We are looking to get our kids a trampoline for Christmas. I have been searching Gumtree and Ebay everyday for a 2nd hand trampoline, but have also been researching brands on the internet and reading lots of reviews. Basically what I have found is the old saying of "You get what you pay for" is largely true.
Looking at trampolines that my friends have bought and what I have read on reviews, it seems as though if you buy your trampoline from a department store (eg Target, Big W, Kmart), you are getting a product built to a price rather than a standard. The reviews on brands sold by these stores, such as Gametime and Action Sports all complain of the same things; mats/padding/nets not even lasting a year, customer service difficult to deal with, assembly instructions inadequate or translated from another language into English. One website I found yesterday gave an in depth report on the structure of the Action trampoline, how it moved about while being jumped on, the uneven bounce of the mat which may result in injury and the author said they felt it wasn't very safe. Many review websites feature complaints from people vowing never to buy those brands again. Occassionally some say they are happy with their purchase. Most trampolines are kept out in the weather, so there will always be some wear and tear, but from what I have read, the better brands last longer as they have better UV and rain protection.
Trampolines bought from a trampoline shop or on-line trampoline shop fare much better in the reviews. If you are looking for a trampoline, look out for ones that say the mat is made in the USA or Australia, as these seem to be the best. The mats last years compared to cheaper ones, even when kept out in the weather. I have read good reports on Oz Trampolines, Vuly and Jump Start.
99.9% of the trampolines I have seen on Gumtree have been bought from one of the above mentioned department stores. All of those are only a year or two old and need bits replacing. I found one that was bought from a trampoline on-line store with a mat made in the USA. The padding and net need replacing but the owners have had it for quite a few years and their girls still jump on it everyday. Only getting rid of it to buy a bigger one. I can get replacement padding and nets relatively inexpensively from Oz Trampolines and Jump Start. My husband is planning to go and have a look at it on Saturday to see if his opinion of it is the same as mine. If so, then we will probably buy it and get the bits replaced. The mat is in excellent condition. If it works out and all goes to plan, we should have a good quality trampoline (with new net and padding) and it only costing us less than $200.
Ours will also be out in the weather.
Wednesday, December 3, 2014

Sunday, November 23, 2014
Microwave herb drying
I read an article recently in the Grass Roots magazine about how to dry herbs in your microwave. I had a go with Corriander and it worked really well. Here is how it goes:
The article is written by Carol Fletcher and she suggests picking the herbs early in the morning when they are fresh. If you water them the night before, you probably won't need to wash them when you pick them, as all the dust and dirt will have been washed off them with the watering.
Pull the leaves off and Carol suggests putting the leaves in piles of similar sized leaves. Although I found it worked ok putting different sized leaves together, just refer to my tip a bit later in this piece.
Place the leaves on paper towel and place another piece of paper towel on top. Put this carefully into the microwave. If your microwave is 1100watts, microwave on high for 2 mins, longer may be needed if your microwave is not as powerful. Carefully lift the paper towel with herbs out and flip it over. Place back in the microwave and give it another minute on high.
Take them out again and remove any leaves that have gone crunchy. Any that are still damp, put back in the microwave and give them 20 second burst until they are crunchy. If you put in different sized leaves like I did, smaller ones will go crunchy first. Each time pull out the ones that have gone crunchy so they don't burn.
Carol suggests that each time you dry herbs, use fresh paper towel so you don't transfer the tastes. So if you are doing basil followed by parsley for example, you would change the paper towel.
Store them in air tight containers. I picked a heap of corriander and dried them for use when my corriander is out of season. I found it is a quick way of drying herbs when you only have fresh herbs but the recipe you are making at them time requires dried herbs.

The article is written by Carol Fletcher and she suggests picking the herbs early in the morning when they are fresh. If you water them the night before, you probably won't need to wash them when you pick them, as all the dust and dirt will have been washed off them with the watering.
Pull the leaves off and Carol suggests putting the leaves in piles of similar sized leaves. Although I found it worked ok putting different sized leaves together, just refer to my tip a bit later in this piece.
Place the leaves on paper towel and place another piece of paper towel on top. Put this carefully into the microwave. If your microwave is 1100watts, microwave on high for 2 mins, longer may be needed if your microwave is not as powerful. Carefully lift the paper towel with herbs out and flip it over. Place back in the microwave and give it another minute on high.
Take them out again and remove any leaves that have gone crunchy. Any that are still damp, put back in the microwave and give them 20 second burst until they are crunchy. If you put in different sized leaves like I did, smaller ones will go crunchy first. Each time pull out the ones that have gone crunchy so they don't burn.
Carol suggests that each time you dry herbs, use fresh paper towel so you don't transfer the tastes. So if you are doing basil followed by parsley for example, you would change the paper towel.
Store them in air tight containers. I picked a heap of corriander and dried them for use when my corriander is out of season. I found it is a quick way of drying herbs when you only have fresh herbs but the recipe you are making at them time requires dried herbs.

Lazy gardening tip: let it go to seed
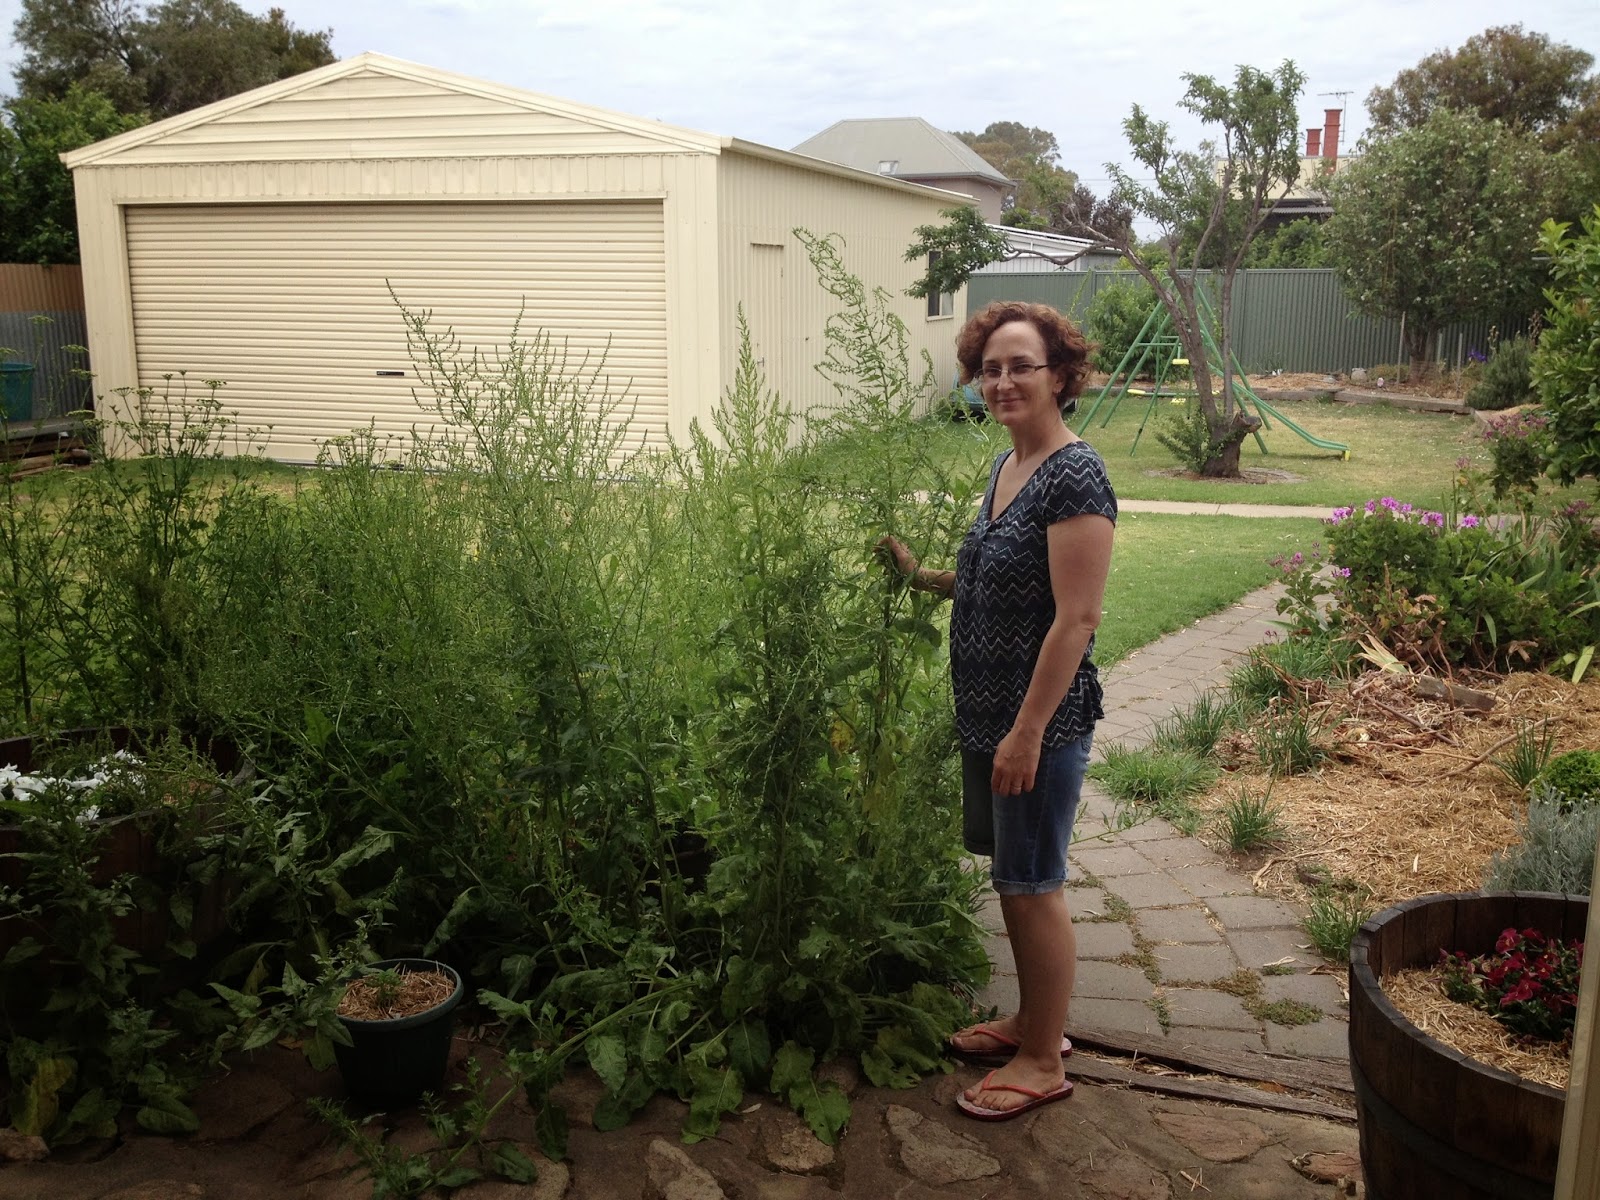
There's an old saying; one years seeds, seven years weeds. Well, the same could be said for my gardening technique. A few years ago when I was setting up my vegie patch, my mother-in-law planted some spinach in a pot for me. Each year I let it go to seed and watch with interest where it takes hold. I do the same with my parsley and lettuce. The only assistance I give them is occassionally when I am walking past I will grab a handful of seeds and scatter them somewhere else in the garden. I have much more luck with this lazy form of gardening than I do with seeds that I have planted according to the instructions on the packet.
In this photo I am standing next to my spinach and silverbeet which is going to seed. On the left of the spinach and silverbeet are some parsley, also going to seed.
Picking produce grown from plants that have self seeded is the closest thing to having a free lunch. I water the plants and put some seaweed extract and organic fertilizer on them, and that's pretty much all the attention they get from me...apart from picking the snails off them.
I find that the plants grow very well, perhaps it has something to do with nature deciding where they will grow best in the garden rather than interference from me. That's the way I prefer my garden to grow.
Wednesday, November 5, 2014
Teaching our children to speak...and avoid the speech pathologist!
On my daughters last visit to the pediatrician, he was impressed with the size of her vocabulary and that she was already talking in sentences. This was normal for me, as my son had an equally large vocabulary at the same age. The doctor commented that he is seeing an increasing number of children requiring a referral to a speech pathologist. So why is this so?
Now, I'm not a speech pathologist, just a parent who had two children considered early talkers. I never set out to have early talkers, I just wanted to help my children communicate their needs. So, I'm not an expert, but here is what I did.
Firstly, when pregnant with my first child, baby signing was recommended to me as a way of teaching children to communicate to avoid them having tantrums when they can't express what they want. My husband and I bought a book and read about it. We did read that children who do baby signing usually end up being early talkers, but that still wasn't our inspiration. When our son was born, we started doing baby signing from day one. For those of you not familiar with baby signing, you do "signs" for a few basic words (eg; milk, change nappy, drink, hot, dog) and use these whenever you are talking to your child. You don't actually teach the words as a lesson, just use them in context. For example, the action for milk is the same as milking a cow, so when you ask them if they would like some milk, you do the action at the same time you say the word.
Eventually they start to do the signs, and quickly learn the word that goes with them. Once they learn to say the word, they drop the signing as it's no longer required. They then want to learn more words and signs to give more meaning to their communication. They go from wanting to tell you they can see a dog while out walking to wanting to tell you it's a big dog and they want to pat it.
Both of our children did their first sign at 7 months. I can't tell you how much of a relief it is that a child can sign "milk" when they aren't well and grizzly and you are trying to work out what to do to stop them crying! I remember one night getting up to my son in the middle of the night to him signing "hot" and "milk". I took his temperature and he had a fever. I gave him some panadol and a breast feed and he settled back down quickly. I wonder how long it would have taken me to work out what was wrong if he couldn't sign, as he couldn't yet say those words?
Secondly, as my son was approaching toddlerhood, I read a book about Neuro-Linguistic Programming as a method of avoiding the terrible twos. I didn't know at the time, but was told later by a speech pathologist that I met, that one of the activities I did from the book contributed to him learning to speak. The book advised that each time an instruction is given, keep the wording brief, as otherwise all the child will here is blah, blah, blah instead of the important words. So "Your nappy's wet, let's go and change your nappy'" becomes simply "Change nappy." (I would also do the baby sign for change nappy).
A game you can play with your child is put three objects in front of them, for this example I'll use farm toys. Pick each item up and simply say its name. Then pick each item up one at a time and say "Mum pick up cow" then using the child's name say "(name) pick up cow". Once they pick it up, give them positive feedback (yay, clap hands). This activity was in the NLP book and also mentioned by the speech pathologist.
I found that once they learn to talk, other concepts start to fall into place. My daughter is 20 months and can name colours and is learning to count. My son was the same and consequently learnt maths very early on (and now is a little obsessed with numbers). With my son I was constantly stopped in the supermarkets and asked why he wasn't at school, and usually the person asking was surprised when I said he wasn't old enough. I can expect the same for my daughter as she gets a little older as she talks just as much.
The other day my husband took the kids for a walk. When they returned my daughter said "Walk dad, I see pussycat, I see dog walking with lady."
The upside to having children who are early talkers are that they find it easy to communicate. The down side is that once they start talking....they don't stop!
Now, I'm not a speech pathologist, just a parent who had two children considered early talkers. I never set out to have early talkers, I just wanted to help my children communicate their needs. So, I'm not an expert, but here is what I did.
Firstly, when pregnant with my first child, baby signing was recommended to me as a way of teaching children to communicate to avoid them having tantrums when they can't express what they want. My husband and I bought a book and read about it. We did read that children who do baby signing usually end up being early talkers, but that still wasn't our inspiration. When our son was born, we started doing baby signing from day one. For those of you not familiar with baby signing, you do "signs" for a few basic words (eg; milk, change nappy, drink, hot, dog) and use these whenever you are talking to your child. You don't actually teach the words as a lesson, just use them in context. For example, the action for milk is the same as milking a cow, so when you ask them if they would like some milk, you do the action at the same time you say the word.
Eventually they start to do the signs, and quickly learn the word that goes with them. Once they learn to say the word, they drop the signing as it's no longer required. They then want to learn more words and signs to give more meaning to their communication. They go from wanting to tell you they can see a dog while out walking to wanting to tell you it's a big dog and they want to pat it.
Both of our children did their first sign at 7 months. I can't tell you how much of a relief it is that a child can sign "milk" when they aren't well and grizzly and you are trying to work out what to do to stop them crying! I remember one night getting up to my son in the middle of the night to him signing "hot" and "milk". I took his temperature and he had a fever. I gave him some panadol and a breast feed and he settled back down quickly. I wonder how long it would have taken me to work out what was wrong if he couldn't sign, as he couldn't yet say those words?
Secondly, as my son was approaching toddlerhood, I read a book about Neuro-Linguistic Programming as a method of avoiding the terrible twos. I didn't know at the time, but was told later by a speech pathologist that I met, that one of the activities I did from the book contributed to him learning to speak. The book advised that each time an instruction is given, keep the wording brief, as otherwise all the child will here is blah, blah, blah instead of the important words. So "Your nappy's wet, let's go and change your nappy'" becomes simply "Change nappy." (I would also do the baby sign for change nappy).
A game you can play with your child is put three objects in front of them, for this example I'll use farm toys. Pick each item up and simply say its name. Then pick each item up one at a time and say "Mum pick up cow" then using the child's name say "(name) pick up cow". Once they pick it up, give them positive feedback (yay, clap hands). This activity was in the NLP book and also mentioned by the speech pathologist.
I found that once they learn to talk, other concepts start to fall into place. My daughter is 20 months and can name colours and is learning to count. My son was the same and consequently learnt maths very early on (and now is a little obsessed with numbers). With my son I was constantly stopped in the supermarkets and asked why he wasn't at school, and usually the person asking was surprised when I said he wasn't old enough. I can expect the same for my daughter as she gets a little older as she talks just as much.
The other day my husband took the kids for a walk. When they returned my daughter said "Walk dad, I see pussycat, I see dog walking with lady."
The upside to having children who are early talkers are that they find it easy to communicate. The down side is that once they start talking....they don't stop!
Tuesday, November 4, 2014
Tips on using scrap material to make new clothes
Do you have a pile of scrap material in your sewing stash? I have, and am endeavouring to reduce the size of the pile to make more room in my cupboards! Included in my scrap material stash was some lovely "vintage" material given to me by my best friend. I sorted through my patterns until I found something I wanted to make, then sorted through the scrap material she sent me until I found a piece big enough to make the pattern.
 Here are my tips for using scrap material when sewing:
1. When I laid the material out, I found that the selvedge on one side was missing. To make up for the missing selvedge, I folded the material in half lengthways and using my measuring tape, carefully measured the width of the material. The width of the material needed to be equal all the way along. Mark a line along where the existing selvedge lays along the material and cut off the excess. This new cut edge becomes the missing selvedge.
2. The grain line. If the pattern piece you are wanting to trace onto your material has a grain line, and you are missing one selvedge, measure the grain line (on both ends of the line) from the one selvedge that you do have.
3. Don't have enough to make the pattern? Considering using a contrast material. Fortunately for this pattern I had enough material.
4. What else is in your stash that you can use? I looked in my sewing supplies and found some iron-on embroidery that matched perfectly, as well as cotton and buttons the right colour and elastic for the shorts. The only things I didn't have (a good excuse to go to Spotlight - not that I ever need an excuse!) was some matching trim and overlocker thread in the right colour.
Now I have a gorgeous outfit for my daughter and can't wait for her to try it on. The only mistake I made was sewing the trim on in the green cotton that was already loaded onto the sewing machine, I should have used white. I hope it is a little on the large side when she tries it on so that she can get two summers out of it. It's a shame to make lovely clothing for children to outgrow them in a few months. Oh, and if anyone has scrap Peppa Pig material, send it my way!
 And when did I find the time to sew with two small children around! Well, the house hasn't been cleaned for the few days while I made this and the children have entertained themselves to some degree. Fortunately the eldest had kindy today and the youngest is having a daytime sleep!

1. When I laid the material out, I found that the selvedge on one side was missing. To make up for the missing selvedge, I folded the material in half lengthways and using my measuring tape, carefully measured the width of the material. The width of the material needed to be equal all the way along. Mark a line along where the existing selvedge lays along the material and cut off the excess. This new cut edge becomes the missing selvedge.
2. The grain line. If the pattern piece you are wanting to trace onto your material has a grain line, and you are missing one selvedge, measure the grain line (on both ends of the line) from the one selvedge that you do have.
3. Don't have enough to make the pattern? Considering using a contrast material. Fortunately for this pattern I had enough material.
4. What else is in your stash that you can use? I looked in my sewing supplies and found some iron-on embroidery that matched perfectly, as well as cotton and buttons the right colour and elastic for the shorts. The only things I didn't have (a good excuse to go to Spotlight - not that I ever need an excuse!) was some matching trim and overlocker thread in the right colour.
Now I have a gorgeous outfit for my daughter and can't wait for her to try it on. The only mistake I made was sewing the trim on in the green cotton that was already loaded onto the sewing machine, I should have used white. I hope it is a little on the large side when she tries it on so that she can get two summers out of it. It's a shame to make lovely clothing for children to outgrow them in a few months. Oh, and if anyone has scrap Peppa Pig material, send it my way!

Saturday, October 25, 2014
When to be frugal and when to say "Hang the expense!" - Buying school uniforms.
My eldest starts school next year so this week I went to a parent orientation night at the school. One of the items on the agenda was uniforms, and they had a small display there. There are two options - you can buy the school uniform from the school or buy standard uniforms from department stores and just buy the logo from the school to sew onto the clothes. Another option would also be that you could make the clothes yourself in the approved colours and put the school logo on.
If I wanted to be really frugal I could have gone with the option of buying cheap imported clothes from a department store or made them myself. However, this was one time when I went "Hang the expense!" and bought the clothes from the school.
There are many times, when we are trying to save money and avoid waste, that we chose to go for the more expensive option. My husband and I decided to buy the school uniform and school bag (a backpack designed by the school to suit the needs of their students - they even gave a demonstration of what items go where in the bag) for the following reasons.
1. Time factor. Yes, I would love to make the clothes myself, but I don't envisage having the time to make the items I can make between now and the end of January when school starts, what with Christmas in between and having a younger child at home. I may get to make one pair of shorts to have as a spare pair in his bag, but to make three pairs of cargo shorts with zippers in that time might be a big ask.
2. Capability factor. I can make the shorts and bucket hat myself, but the particular style of the polo shirts would be beyond what I am capable of making, so the only option would be to buy the shirts anyway. I certainly don't have what it takes to make the fantastic school backpack that they have on offer, either.
3. Value for money. I was impressed with the permanent pleat cargo shorts, although imported, looked good quality. The polo shirts are made in Australia. The bucket hat also imported. The bag is very good quality (I don't know where it was made). I bought the bag, one hat, three shirts and two pairs of shorts, and it cost $154.00 which I thought was pretty good. The individual items were priced not much more expensive than the department stores, so I wouldn't have gained much by shopping elsewhere by the time I would have had to buy the school logos and sew them on. I'm hoping that when my second child starts school, these items will still be good enough for her to wear to make it even better value for money. Unfortunately I don't know anyone with older children at the school to have been able to have uniforms handed down to us like some of the other parents waiting at the uniform shop had.
4. One stop shop. I got all his uniform needs in one place, without then having to head off to a department store and then back to the school to buy logos. Time is money, as they say.
5. Blending in with everyone else. Standing outside the uniform shop waiting for it to open (it's on the school site) I noticed all the students wearing the regulation school uniform shirt. At least by buying the uniforms there, my child(ren) will be wearing the same as everyone else. Shorts are not such a big deal, as they don't stand out as much as a shirt, so even if I do get time to make a pair in the right colour it won't be noticeable.
My son has always been excited about starting school next year, however after our trip to the uniform shop, he skipped the rest of the way to Kindergarten!
If I wanted to be really frugal I could have gone with the option of buying cheap imported clothes from a department store or made them myself. However, this was one time when I went "Hang the expense!" and bought the clothes from the school.
There are many times, when we are trying to save money and avoid waste, that we chose to go for the more expensive option. My husband and I decided to buy the school uniform and school bag (a backpack designed by the school to suit the needs of their students - they even gave a demonstration of what items go where in the bag) for the following reasons.
1. Time factor. Yes, I would love to make the clothes myself, but I don't envisage having the time to make the items I can make between now and the end of January when school starts, what with Christmas in between and having a younger child at home. I may get to make one pair of shorts to have as a spare pair in his bag, but to make three pairs of cargo shorts with zippers in that time might be a big ask.
2. Capability factor. I can make the shorts and bucket hat myself, but the particular style of the polo shirts would be beyond what I am capable of making, so the only option would be to buy the shirts anyway. I certainly don't have what it takes to make the fantastic school backpack that they have on offer, either.
3. Value for money. I was impressed with the permanent pleat cargo shorts, although imported, looked good quality. The polo shirts are made in Australia. The bucket hat also imported. The bag is very good quality (I don't know where it was made). I bought the bag, one hat, three shirts and two pairs of shorts, and it cost $154.00 which I thought was pretty good. The individual items were priced not much more expensive than the department stores, so I wouldn't have gained much by shopping elsewhere by the time I would have had to buy the school logos and sew them on. I'm hoping that when my second child starts school, these items will still be good enough for her to wear to make it even better value for money. Unfortunately I don't know anyone with older children at the school to have been able to have uniforms handed down to us like some of the other parents waiting at the uniform shop had.
4. One stop shop. I got all his uniform needs in one place, without then having to head off to a department store and then back to the school to buy logos. Time is money, as they say.
5. Blending in with everyone else. Standing outside the uniform shop waiting for it to open (it's on the school site) I noticed all the students wearing the regulation school uniform shirt. At least by buying the uniforms there, my child(ren) will be wearing the same as everyone else. Shorts are not such a big deal, as they don't stand out as much as a shirt, so even if I do get time to make a pair in the right colour it won't be noticeable.
My son has always been excited about starting school next year, however after our trip to the uniform shop, he skipped the rest of the way to Kindergarten!
Monday, October 20, 2014
Book review: "Backyard Self-Sufficiency" by Jackie French
I love my local library. It is such a wonderful resource, not only for the great range of books and cds, etc that you can borrow from it, but it has a toy library and runs lots of general interest activities as well as programs for kids. But enough of that...here's a little gem I borrowed from my library last week, and will be reluctant to return it when it is due.
"Backyard Self-sufficiency" by Jackie French is inspiring right from the first few pages. Lately I've been reading quite a few books and magazines about self-sufficiency, permaculture and other related topics and the thing that impresses me the most about this book it that it's realistic. Many people wanting to aim for a more frugal and/or self sufficient lifestyle want to take small or realistic steps in achieving that goal, unfortunately many books and magazines can frighten you off by demonstrating models of total self sufficiency. Jackie mentions having to make her own soap, toothpaste and other products when she didn't have much money but says if you don't need to make them then why would you? Having looked at quite a few methods for making soap with the notion of making my own, but being dismayed that all soap making methods require wearing a mask and gloves at some stage in production, I decided it was best left to the soap makers.
It is such a delight to read that within the first few pages it had me wanting to rip out large sections of my lawn in the back yard and planting more "stuff". Reading what she does with her vegies and fruit has filled my head with ideas.
I also love her 'no-dig' method of gardening. It certainly fits in with my 'lazy' attitude to gardening. I have already been out in the yard and spread sheets of newspaper covered with glass clippings. As her book is Australian, the information in it is certainly relevant to our conditions. Often books are written overseas where the conditions and climate are different, and plants behave differently.
There is so much more I could say about this book, but do yourself a favour, and pop down to your local library and have a read yourself!
"Backyard Self-sufficiency" by Jackie French is inspiring right from the first few pages. Lately I've been reading quite a few books and magazines about self-sufficiency, permaculture and other related topics and the thing that impresses me the most about this book it that it's realistic. Many people wanting to aim for a more frugal and/or self sufficient lifestyle want to take small or realistic steps in achieving that goal, unfortunately many books and magazines can frighten you off by demonstrating models of total self sufficiency. Jackie mentions having to make her own soap, toothpaste and other products when she didn't have much money but says if you don't need to make them then why would you? Having looked at quite a few methods for making soap with the notion of making my own, but being dismayed that all soap making methods require wearing a mask and gloves at some stage in production, I decided it was best left to the soap makers.
It is such a delight to read that within the first few pages it had me wanting to rip out large sections of my lawn in the back yard and planting more "stuff". Reading what she does with her vegies and fruit has filled my head with ideas.
I also love her 'no-dig' method of gardening. It certainly fits in with my 'lazy' attitude to gardening. I have already been out in the yard and spread sheets of newspaper covered with glass clippings. As her book is Australian, the information in it is certainly relevant to our conditions. Often books are written overseas where the conditions and climate are different, and plants behave differently.
There is so much more I could say about this book, but do yourself a favour, and pop down to your local library and have a read yourself!
Subscribe to:
Posts (Atom)